Introduction
node-cron is a Node.js library that allows you to schedule periodic tasks using cron syntax. It allows you to define recurring schedules by specifying minute, hour, day of the month, month, and day of the week using cron-like strings.
It’s very easy to use and you can schedule functions or tasks to execute at specific intervals, such as every minute, hourly, or on a custom schedule, including the ability to specify timezones.
Overall, node-cron simplifies the implementation of scheduled tasks in Node.js, making it a very good choice for automatic recurring processes.
How to Install node-cron
Install node-cron using the following command in your project terminal:
npm install --save node-cronThere are no other dependencies or tasks to complete after this step.
Import / Require node-cron
node-cron supports both commonJS and ES Modules imports. By the way, if you’re struggling with a mixture of commonJS and ES modules then I can recommend bun js as a drop in replacement to nodejs. Bun lets you mix and match commonJS and ES modules.
Require node-cron (commonJS)
Use the following statement at the top of your file to import node via “require”.
var cron = require('node-cron');Import node-cron (ES Modules)
Use the following statement at the top of your file to import node-cron.
import cron from 'node-cron';Schedule a Basic Task in node-cron
In order to become fully proficient with node-corn you should first learn the cron syntax for time periods. Wikipedia will tell you all you need to know or have a look at the image below.
Cron Syntax
The following image is a basic run down of the cron syntax that node-cron relies on.
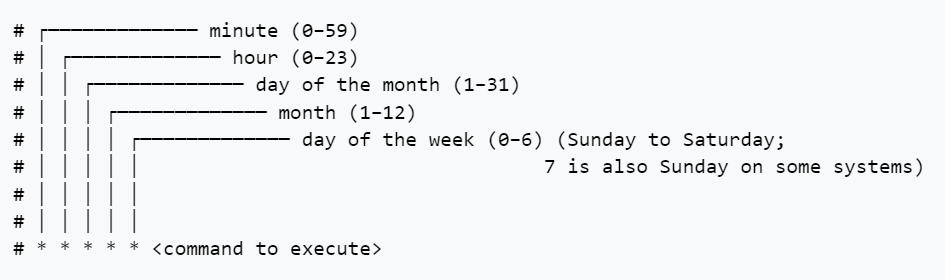
For example a command of * * * * * <code to execute> would execute your code every single minute. The asterisk (*) character denotes “every” so in this case “every minute of every hour of every day etc”.
A command of 1 * * * * <code> executes on the 1st minute of every hour, every day, every week etc.
Schedule a Task
To setup a task in node-cron simply use the imported object:
cron.schedule('* * * * *', () => {
  console.log('running a task every single minute for eternity...');
});
Configure node-cron Properties
The second argument when running the schedule method allows you set certain properties on the scheduled code. For example, below you can set the task to be registered but not actually scheduled to begin:
const task = cron.schedule('* * * * *', () =>  {
  console.log('this will not run until "task" is called with the start() method');
}, {
  scheduled: false
});
Full List of node-cron Configuration Properties
Scheduled
scheduled: true / falseBy default this is true and will register your job to start immediately.
Name your Task
name: 'any-name-you-like'The name is printed in logs which helps you identify where that particular entry came from.
Set a Timezone
You can setup your job to run at the schedule for a timezone. Uses the IANA standard timezone database for valid values.
timezone: Asia/ShanghaiRecover Missed Executions
node-cron can be setup to try and recover missed executions (eg, if your server restarts). I would advise caution with setting this to true. Otherwise, the default value is false.
recoverMissedExecutions: trueSchedule Multiple cron Times
node-cron allows you to chain multiple schedules to run the same job. Simply separate your cron values with a comma as below.
import cron from 'node-cron';

cron.schedule('0,15,30,45 * * * *', () => {
  console.log('running every 15 minutes');
});
Note that the comma separation (without spaces) applies to that particular entry in the cron specification.
Node-cron Specify a Range
To specify a range when you’d like your code to run then use the dash character:
import cron from 'node-cron';

cron.schedule('30-45 * * * *', () => {
  console.log('running every minute to the 30th minute to the 45th');
});
Node-cron Step Values (eg Every 2 minutes)
With the forward slash you can “divide” the range by a number. So in order to schedule something every 2 minutes at the start of the hour you could write:
import cron from 'node-cron';

cron.schedule('30-45/2 * * * *', () => {
  console.log('Run a task every two minutes from the 30th minute');
});
Node-cron Using Names for Months & Days
You can use month and day names instead of numbers if you prefer. Both full names and abbreviations work:
import cron from 'node-cron';

cron.schedule('* * * February,July Monday,Sunday', () => {
  console.log('running on all Mondays and Sundays of February & July');
});

//OR

cron.schedule('* * * Feb,Jul Mon,Sun', () => {
  console.log('running on all Mondays and Sundays of February & July');
});
Controlling node-cron, Methods
There are several handy methods that allow you to control the task you’ve setup.
Node-cron Schedule Method
We’ve covered this already. Simply sets up a task and schedules it.
cron.schedule('* * * * *', () => {
  console.log('running every minute');
});
Node-cron Start Method
If your task is setup and you choose the “scheduled: false” option then you’ll need to call start on the task to start the timer:
import cron from 'node-cron';

const task = cron.schedule('* * * * *', () =>  {
  console.log('task wont run');
}, {
  scheduled: false
});

task.start();
Stop Method
Any task can be stopped at any time. HOWEVER – exercise caution when using this programmatically. You may prematurely end a running task if you call stop. Best to thoroughly test this out and, of course, apply ACID principles so that you fail safe.
import cron from 'node-cron';

const task = cron.schedule('* * * * *', () =>  {
  console.log('will execute every minute, forever');
});

task.stop();
Validate Method
If you’d like to test the cron string before running it you can use the validate method:
import cron from 'node-cron';

const valid = cron.validate('45 * * * *');
const invalid = cron.validate('120 * * * *');
List all Tasks Method
You can list all tasks in the scheduler by using:
import cron from 'node-cron';

const tasks = cron.getTasks();

for (let [key, value] of tasks.entries()) {
  console.log("key: ", key)
  console.log("value: ", value)
}
Iterating the list will return all the objects with associated metadata, including execution data:
- _events
- _eventsCount
- _maxListeners
- options
- _task
- ….and more….
Leave a Reply