When writing files to disk in node you have to be careful. Many times file writes require insertion of large chunks of data over a (relatively) long period of time. The key thing to avoid is opening the file multiple times which is resource intensive.
It is far better to open the file once and hold that file handle in memory, ready to be used the next time. For that we use the createWriteStream async method.
createWriteStream async in Node fs
This method gives you ultimate control over file handling, which means more responsibility. Therefore you have to handle file opens, closes, errors and everything else that may go wrong.
Let’s first look at the single line of code needed to create a createWriteStream:
//cteate your sreite stream with optional optionsfs.createWriteStream (myFilePath,myOptions)------------------------------------------myOptionscanbeanyofthe following:options<Object>encoding<string> Default:'utf8'//file encodingautoClose<boolean> Default:true//autoclose after write? false = close it yourselfemitClose<boolean> Default:true//emit event to notify file closedstart<integer>//where should you insert the content?highWaterMark<number> Default:16384//how much data should this method gather before it's flushed to the fileflush<boolean>// File descriptor flushed prior to closing. Default = false.
Most of these will not be specified by you, just leave them as defaults. However, you may want to play with highWaterMark depending on your use case. That sets the buffer size and should be matched to the size / frequency of data streaming you have.
NOTE: Always use a resource monitor such as atop or htop to know if you have issues!
createWriteStream async Full Example
Before we start, note that to use createWriteStream in its async promise based version (instead of callback versions) you use the fs module and not the fs.promises module! I know, I know it’s counterintuitive!
The code below opens a write stream, writes something to a file on 2 separate calls then closes the file.
constfs=require('fs');//the main fs libtry{//always wrap in try catch as file writes can be error prone, especially on linux hosts...//create the writer object we can reuseletwriter=awaitfs.createWriteStream('log-stream.txt',{encoding:'utf8',highWaterMark:16384,flags:'a',//open and append (don't overwrite file)});//use the writer objectawaitwriter.write("Log 10: what happened in last 10s");awaitwriter.write('\r');//create a new line//sometime laterawaitwriter.write("Log 20: what happened in last 10s");//finally close the file to avoid memeroy leaks and file access issues!awaitwriter.close()}catch (err) {console.error('Error occurred while writing file:',err);}
Important notes: The above code shows a simplified step by step process to make it clear for you. To implement this in a real app, you would never write it this way, instead you’d create separate functions to handle file open, write and close – then call each function as you need them in your code.
createWriteStream Events and Listeners
FS gives us a lot of control over the file handling process, which means we can manually do everything ourselves. One of those options is choosing whether fs should close the file automatically or if we should listen to events and do it ourselves.
If your file write is long in duration, over multiple chunks, then you can tell FS to leave the file open, saving the overhead of opening it over and over.
This is perfect for server logs, for example. To do this we will listen to events called by createWriteStream. Here’s an example (code below):
Open the file writer with createWriteStream
Tell createWriteStream that we want to handle file closing ourselves (autoClose flag)
Register event listeners for open, ready and close
Write some text to a file
Use the listeners and callbacks to decide when to perform next actions
Close the writer once a write has been completed
Remove all writer listeners to avoid memory leaks!
Next, I have written the code in a step by step manner which is not realistic. You would separate this out in production to be called by the main program, as needed:
Example createWriteStream async Code (Events)
constfs=require('fs');//the main fs libtry{letwriter=awaitfs.createWriteStream("log-stream.txt",{encoding:"utf8",highWaterMark:16384,autoClose:false,emitClose:true,flags:"a"})//add a listener with options such as open, close, readyawaitwriter.addListener("open",async()=>{console.log("Log file OPEN!")})awaitwriter.addListener("ready",async()=>{console.log("Log file READY!")})awaitwriter.addListener("close",(fd)=>{console.log("Log file CLOSED")})writer.write("hello world \r\n",async()=>{awaitcloseWriter(writer)})}catch (err) {console.error('Error occurred while writing file:',err)}asyncfunctioncloseWriter(writer){awaitwriter.close(async()=>{awaitwriter.removeAllListeners() // important to avoid memory leaks!})}
Worth mentioning again: DO NOT forget to unsubscribe to your writer listeners on writer close or you’ll get memory leaks!
Summary
createWriteStream gives you power over all aspects of file writes but with great power comes great responsibility!
As long as you handle events appropriately and monitor resource usage then you should be able to avoid pitfalls of this method and retain complete control over your file writes.
The path module in node allows us to work with files and directories. Everything you can do with the command line (or a mouse) can be done with the path module.
This blog post aims to be the vest resource out there and includes my experience as a long time node developer. If you have some tips and tricks then please leave a comment!
It’s important to note that the path module is generally platform independent, not caring what flavour of linux, windows or Mac you’re on, although typically you’re probably running Centos / Ubuntu or some other server flavour of linux.
However, just because it’s generally platform independent doesn’t mean that you won’t have issues, especially around file access permissions! Typically the process running node also needs full access to the directories you’re working with. If you get errors then permissions is usually the culprit.
Another thing to be aware of is that some commands return default directory separators for that particular operating system. Eg double backslash (\\) in Windows or single forward slash in *nix (/). Where that’s the case you should probably use the following classes:
path.win32.[your_function] which gives you double backslash separators no matter the system OS.
path.posix.[your_function] which gives you single forward slash separators no matter the system OS.
For the remainder of this reference article we will assume you’re running on some flavour of Linux server and won’t be switching between the two. If you do have to support multiple environments then just be aware of the above.
2. Information from Directory or Path
A very common use case you’ll come across is to get certain pieces of information from a file or directory. Typically you’ll mostly want the file name. Let’s take a file location such as:
/var/www/html/data/private_diary.txt
It’s very common of the beginner to think “just split the string by the / character and take the last member of the array as the filename”. Yes, you can do this but some operating systems use backslash directory separators. That means more complex code and no guarantee your code will run on another OS.
Instead, node:path has this figured out already! You can use the following:
path.basename(path, [ext])
This method allows you to extract the filename from a path, eg:
This extension removal function is case sensitive so be very careful. Normally that’s not an issue as most extensions are lower case but could be a gotcha in your case.
Personally, if I need the extension then I tend to use a string.split by period character. The last member of the array should be the extension (or if no file extension is present then there should only be one member in array, in which case there’s nothing to do). Alternatively you can use the extname method detailed later in this article.
path.dirname(path)
This method allows you to retrieve information about the path preceding the file name. Eg:
NOTE: The final directory separator ( / ) is not included in the result!
path.extname(path)
This method retrieves the extension of the file (after a period character):
path.extname(/var/www/index.ts) => .ts
NOTE 1: This method returns the period as well! Result from this can be used as the second argument in the path.basename function to strip the filename extension.
NOTE 2: If there’s no extension then this will return an empty string, so you may want to check for that.
NOTE 3: If the file name has only a period without extension eg: “myfile.” then a single period “.” will be returned.
NOTE 4 (important): If the path starts with a period eg: “.myfile” then you will get a blank string returned (GOTCHA!).
I find you need to really validate results with this method to be sure you’re getting what you expect, especially if you have uncontrolled user inputs.
path.parse(path)
Takes a path and breaks it up into constituent components accessible as properties:
path.parse(‘/var/www/site/key.txt’) will output an object with properties:
Note that if you include a delimiter ( / ) then the function will pick that up as a preconfigured path segment. Be very careful of adding posix command strings such as “..” which means to go back one level in the path, eg:
path.join(‘/foo’, ‘bar’, ‘..’) => /foo
For the above you might expect /foo/bar but addition of the “..” command makes it go back one directory!
path.resolve([…paths])
This method provides an absolute path from the paths passed in. If the first path does not include the path delimiter ( / ) then the current working directory will be added to the start of the resulting path. Eg, if your current directory is /home/user/:
4. Bonus: Other Useful path Properties and Classes
path.sep
This property returns the current path separator depending on operating system ( \ or / )
path.win32
You can use all of the methods in this post but this class will return Windows specific versions of the results (even if you’re on another OS).
path.posix
You can use all of the methods in this post but this class will return Linux specific versions of the results (even if you’re on another OS).
5. Wrap Up
There are many useful methods in node:path but there are also many gotchas if you plan on running cross platform. If that is you then test, test, test to be sure the output you’re getting is what you need! Personally I have all my paths run through the posix class (section 4) so I have no issues with delimiters. Then all you need is to be sure of absolute directories as they are different on Windows / Nix / Other.
Finally, if you enjoy this post then one of these 2 posts might interest you:
fs (file system) module is a much misunderstood part of node JS, especially the asynchronous versus the synchronous methods. This mega post will cover everything you need to know about fs and more! I include lot’s of architecture guides and potential gotchas (many of which have gotten me in the past).
fs stands for file system, so (almost) anything you can do to a file using your terminal or mouse can also be done with fs.
This article will start with basic file writes and move on to complex writes, file reads and file management. Please do read all the text between code examples as there are many many places you can be tripped up when using fs.
What can fs do?
Because fs is part of node JS on the server it has elevated privileges that allow it to access the file system. That said, if you find that certain file operations fail then please check the linux privileges of your node JS process / server app folder.
The fs module can do many things including:
Open files
Read files
Create and write to files
Update files
Delete files
Rename files
fs Callbacks, Async and General Notes
In this mammoth article we will cover the basic methods needed to read, write and manipulate files. Bear in mind that there are 2 variations of most file manipulation commands in fs, synchronous and asynchronous. Or async and sync for shorthand.
Important Developer PSA: You should always aim to use the asynchronous file manipulation methods. This is because node JS runs on a single thread, is non blocking andevent based. Ie, node expects your code to not block the main thread unnecessarily, which is very important for the responsiveness of your server.
You will very rarely, if ever, need to use synchronous methods in fs so this guide focuses exclusively on the async methods.
Asynchronous methods are further sub divided into 3 versions – callback, promise or async based. These are all essentially the same thing, just different ways of writing code. If you’re not yet familiar with synchronous vs asynchronous programming then please click this to see my most excellent guide on it.
Personally, I always default to async await code. It’s easier to read, flows better and helps you avoid nasty problems like race conditions or cross scope variable assignment, bugs from which are very hard to diagnose.
In the first section (writing basic files) I will also show you the callback version of the sample code but future sections will only use the promise / await syntax. Just know that you can always revert to the callback versions by implementing the relevant structure (but why would you??!?!)
Basic File Writes with fs
Writing Basic Files – writeFile Function
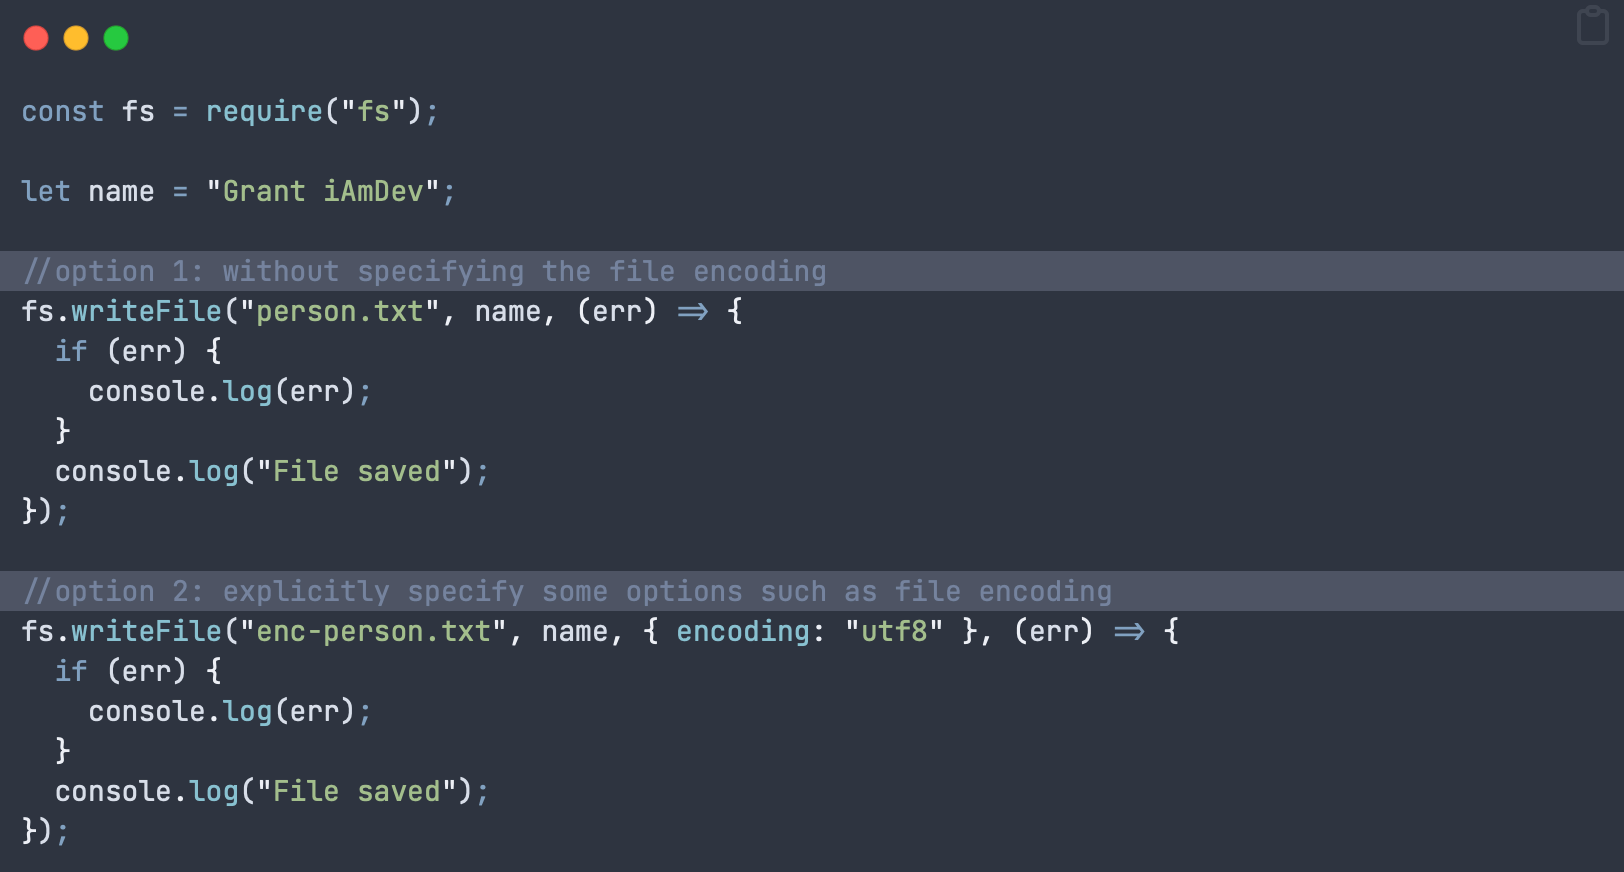
In order to write a basic file in fs we use the writeFile method, which takes 4 parameters:
writeFile (filePath, text to write, encoding (optional, defaults to utf8), return function)
NOTE: This callback version is for reference only, I strongly advise you to use the promises / await styles in the next section!
The callback below is implemented by passing in a function as the last argument of the writeFile method. That function is executed when the tasks completes:
constfs=require("fs");letname="Grant iAmDev";//option 1: without specifying the file encodingfs.writeFile("person.txt",name,(err)=>{if (err) {console.log(err);}console.log("File saved");});//option 2: explicitly specify some options such as file encodingfs.writeFile("enc-person.txt",name,{encoding:"utf8"},(err)=>{if (err) {console.log(err);}console.log("File saved");});
Gotcha 1: writeFile will replace the file if it already exists! There will be no warnings and no thrown errors to let you know!
Gotcha 2: Do not run this method on a file whilst it is being written to by another writeFile call. You should have a flag to lock the file, preventing simultaneous writes!
Developer note: If you’re storing high frequency incoming data, or large data chunks then you should not use this method. Instead opt to use the createWriteStream method described later on.
writeFile – Promise Await Version (Avoid Callbacks)
If you prefer to avoid callback hell you can instead use the promises module included in fs. Note that the import statement changes to “fs/promises”. Quite often I’ve been caught out when visual studio auto imports just “fs” and I’m left scratching my head as to why the await statement doesn’t work!
Obviously, the promise version takes one less parameter as you don’t need to specify a callback function. Also note that we always enclose the writeFile call in a try-catch statement. This is necessary as access to a file is never guaranteed so could be a significant source of app crashes. If you have server logs ensure that a crash like this always gets recorded in there.
importfsfrom'fs/promises'asyncfunctionwriteData(name){try{returnawaitfs.writeFile("person.txt",name,"utf8") //options can use the shorthand version here, just a string automatically assigns file encoding}catch (err) {console.error('Error occurred while writing file:',err)}}
In order to call the above “writeData” function you would use the following line:
awaitwriteData("Grant @ iAmDev")
This call will run asynchronously, without tying up your main thread, but will pause execution of your code until a result is received. This function call will not blockcode in other functions from running, and keeps your app / server responsive.
If there is no error thrown then you can assume that the operation was successful. HOWEVER, I find this code a bit problematic as I usually need to know explicitly if an operation failed or succeeded. The simplest version of this is to return a boolean indicating success or failure. This is the most basic version of this code and there are other things I may do, but those are beyond scope of this article:
asyncfunctionwriteBasicFilePromise(){//always return a boolean so you know if something failed or nottry{awaitfsp.writeFile("person-promise.txt",textToWrite,"utf8")returntrue}catch (err) {console.error('Error occurred while writing file:',err)returnfalse}}//call above function and look at returned "success" to determine code flowconstsuccess=awaitwriteBasicFilePromise()console.log("File write successful? : "+success)
If you’re super fussy you may want to also assert that the file now exists and its content matches what you expect but I hardly ever find this to be necessary.
writeFile in fs – Complete List of Flags & Details
The options object passed in to writeFile allows you to specify filesystem flags that change the default behaviour when opening a file. Here’s a simple example:
awaitfsp.writeFile("person-promise.txt",textToWrite,{flag:"ax"//causes a thrown error if the file already exists!})
The following flags are available for you to use – be careful to choose the right one!
'a': Open file for writing (adding to the end of existing content) + the file is created if it does not exist (default)
'ax': Like 'a' but fails if the file path already exists
'a+': Open file for reading and writing. The file is created if it does not exist.
'ax+': Like 'a+' but fails if the file path exists.
'as': Open file for writing in synchronous mode(be careful not to tie up your main thread). File is created if it does not exist.
'as+': Open file for reading and writing in synchronous mode. The file is created if it does not exist.
'r': Open file for reading. An exception is thrown if the file does not exist so you need to catch that exception.
'rs': Open file for reading in synchronous mode. An error is thrown if the file does not exist.
'r+': Open file for reading and writing. Exception is thrown if the file does not exist.
'rs+': Open file for reading and writing in synchronous mode. Instructs the operating system to bypass the local file system cache. This is useful for opening files on NFS mounts as it allows skipping the potentially stale local cache. It has a big impact on I/O performance so using this flag is not recommended unless it is really, really needed.
'w': Open file for writing. The file is created (if it does not exist) or truncated (if it exists).
'wx': Like 'w' but fails if the path exists.
'w+': Open file for reading and writing. The file is created (if it does not exist) or truncated (if it exists).
'wx+': Like 'w+' but fails if the path exists.
Add Content to File with fs (Append)
Now that we’ve covered basic file writes let’s look at how we add content to the end of a file. This is only really convenient if you want to add to the end of a file. Adding to the middle of a file is notoriously difficult and something you’d need to manage yourself.
Side note: If you ever find you need to write a line in the middle of a file then you should really revise your architecture / storage choices. Usually a structured database, of any kind, would be a much better choice.
We can add content to a file with the appendFile method:
constfs=require('node:fs/promises');asyncfunctionappendTextToFile(){try{constcontent='Extra content at end of file';awaitfs.appendFile('/Users/iamdev/data.txt',content);}catch (err) {console.log(err);}}appendTextToFile();
Note: You can also append to a file using the writeFile method and including the flag ‘a’.
Add Content to Start of a File with node fs (Prepend)
Unfortunately there is no simple way to add content to the start of a file using the standard fs module. However there are libraries that will do this for you such as prepend-file.
Another alternative is to read the content from your existing file into memory, insert your new data and write all that back to the same file. Watch out though, a large file will occupy a lot of memory and if you don’t garbage collect properly then you’ll have mega memory leaks!
Continuous File Writes in node fs
Many times your file writes will require insertion of multiple data blocks over a longer period of time. For this operation you will want to open up a stream that allows addition of data into a file over time, whilst avoiding the overhead of re-opening the same file.
This is achieved in fs with the createWriteStream asynchronous method.
createWriteStream async for Writing Large / Continuous Files in fs
This function is fairly complicated as you are moving into a level below high level writeFile. Therefore you have more control, but also more responsibility in terms of handling file closes, errors etc.
First let’s cover the basic createWriteStream method and all the arguments it can take (with explanations):
fs.createWriteStream (filePath,OPTIONS)OPTIONScanincludeanyofthe following:options<Object>//Specify file encodingencoding<string> Default:'utf8'//Should the file be autoclosed after write? If you set// to false then you must close the file yourself!autoClose<boolean> Default:true//An event telling our code if the file has been closedemitClose<boolean> Default:true//What location should this content be inserted to?// Takes an integer from 0-MAX_ALLOWED_INTstart<integer>//highWaterMark is another way of saying buffer size before// actually writing to filehighWaterMark<number> Default:16384// File descriptor is flushed prior to closing. Defaults to false.flush<boolean>
Of particular note here is the highWaterMark option, aka: buffer size. This sets the amount of data to hold in memory until flushed to file. Note that you can get amazing memory leaks in the order of gigabytes if incorrectly specified for your use case. Whenever your server is running always use something like atop or htop to monitor resource usage!
Now let’s move onto a more substantial example. In the following we are trying to architect createWriteStream in an asynchronous manner. The code below shows you the logical steps you need to do this.
constfs=require('fs');//the main fs libtry{//always wrap in try catch as file writes can be error prone, especially on linux hosts...//create the writer object we can reuseletwriter=awaitfs.createWriteStream('log-stream.txt',{encoding:'utf8',highWaterMark:16384,flags:'a',//open and append (don't overwrite file)});//use the writer objectawaitwriter.write("Log 1: what happened in last 10s");awaitwriter.write('\r');//create a new line//sometime laterawaitwriter.write("Log 2: what happened in last 10s");//finally close the file to avoid memeroy leaks and file access issues!awaitwriter.close()}catch (err) {console.error('Error occurred while writing file:',err);}
Important notes: The above function combines the creation of the write stream (createWriteStream), the write processes and the file close, to make it clear for you. In production you would put the file open, write and close in separate functions.
Then you can call each function as required by your application.
createWriteStream Events, Manual Close etc
As we’re operating at a lower level we can specify if we want file closes to be done automatically or if we should handle them. To do this we must handle these tasks to have a complete file writing system that we control all aspects of:
Open the writer with createWriteStream
Tell that writer we wish to handle file close ourselves, specifying the autoClose flag as “false”
Register our own event listeners for open, ready and close
Write content via that file writer (normally through a separately called function)
Use listeners and callbacks to monitor state of our writes and file handling
Close the writer on completion of a subset of writes / whenever is right for your application
IMPORTANT: call removeAllListeners on completion to avoid memory leaks!
constfs=require('fs');//the main fs libtry{letwriter=awaitfs.createWriteStream("log-stream.txt",{encoding:"utf8",highWaterMark:16384,autoClose:false,emitClose:true,flags:"a"})//add a listener with options such as open, close, readyawaitwriter.addListener("open",async()=>{console.log("Log file OPEN!")})awaitwriter.addListener("ready",async()=>{console.log("Log file READY!")})awaitwriter.addListener("close",(fd)=>{console.log("Log file CLOSED")})writer.write("hello world \r\n",async()=>{awaitcloseWriter(writer)})}catch (err) {console.error('Error occurred while writing file:',err)}asyncfunctioncloseWriter(writer){awaitwriter.close(async()=>{awaitwriter.removeAllListeners() // important to avoid memory leaks!})}
The example code above does things in a stepwise, logical sequence to make it clear. Production code would never do it like this, instead separating it all into functions to be called when required by your app.
Reading files with fs
How to Use readFile in node fs
As with the writeFile function we looked at earlier the readFile function is much the same. Here’s some basic async await code:
constfs=require('node:fs/promises');asyncfunctionreadAndPrintFile(){try{//print out the index.js file that contains your server code!constdata=awaitfs.readFile('index.js',{encoding:'utf8'});console.log(data);}catch (err) {console.log(err);}}awaitreadAndPrintFile();
The above code will print out your index.js file, which should be your server entry point. CHange to any file in your directory as needed.
Note: This will read the whole file into memory. If you don’t have enough memory then your app will slow down at best, crash at worst! Obviously only use this for small files!
A better alternative is to use a stream to read files that are larger.
How to Use createReadStream Async to Read a File
A stream in Node creates a pipeline between content and your application. This avoids having to read a whole file into memory and you can instead listen out for chunks coming from your file:
asyncfunctionstreamTextFromFile(){//NOTE: This function combines createReadStream AND reads the file.// in reality you should separate these 2, only creating the stream once!try{letreader=awaitfs.createReadStream("index.js",'utf8')reader.on('error',function(error){console.log(`error: ${error.message}`);})reader.on('data',(chunk)=>{//NOTE: this outputs RAW hex data if you DON'T set the encoding above!console.log(chunk);})}catch (err) {console.error('Error occurred while stream reading file:',err)returnfalse}}awaitstreamTextFromFile()
If you don’t specify file encoding then you will receive RAW file output (in hex).
Finally
If you enjoyed this but still need help with your application or server then feel free to contact me or find me working as a software developer in Gibraltar.
node-cron is a Node.js library that allows you to schedule periodic tasks using cron syntax. It allows you to define recurring schedules by specifying minute, hour, day of the month, month, and day of the week using cron-like strings.
It’s very easy to use and you can schedule functions or tasks to execute at specific intervals, such as every minute, hourly, or on a custom schedule, including the ability to specify timezones.
Overall, node-cron simplifies the implementation of scheduled tasks in Node.js, making it a very good choice for automatic recurring processes.
How to Install node-cron
Install node-cron using the following command in your project terminal:
npminstall--savenode-cron
There are no other dependencies or tasks to complete after this step.
Import / Require node-cron
node-cron supports both commonJS and ES Modules imports. By the way, if you’re struggling with a mixture of commonJS and ES modules then I can recommend bun js as a drop in replacement to nodejs. Bun lets you mix and match commonJS and ES modules.
Require node-cron (commonJS)
Use the following statement at the top of your file to import node via “require”.
varcron=require('node-cron');
Import node-cron (ES Modules)
Use the following statement at the top of your file to import node-cron.
importcronfrom'node-cron';
Schedule a Basic Task in node-cron
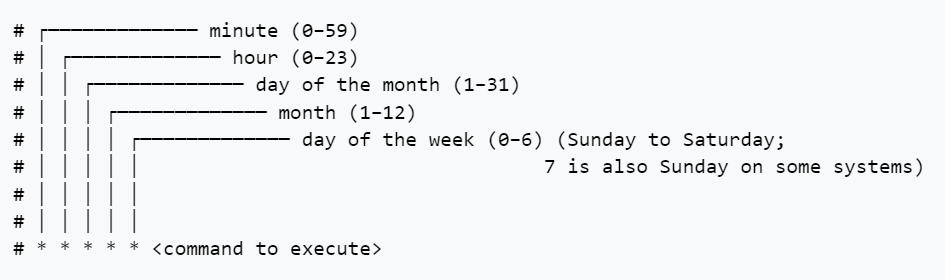
In order to become fully proficient with node-corn you should first learn the cron syntax for time periods. Wikipedia will tell you all you need to know or have a look at the image below.
Cron Syntax
The following image is a basic run down of the cron syntax that node-cron relies on.
For example a command of * * * * * <code to execute> would execute your code every single minute. The asterisk (*) character denotes “every” so in this case “every minute of every hour of every day etc”.
A command of 1 * * * * <code> executes on the 1st minute of every hour, every day, every week etc.
Schedule a Task
To setup a task in node-cron simply use the imported object:
cron.schedule('* * * * *',()=>{console.log('running a task every single minute for eternity...');});
Configure node-cron Properties
The second argument when running the schedule method allows you set certain properties on the scheduled code. For example, below you can set the task to be registered but not actually scheduled to begin:
consttask=cron.schedule('* * * * *',()=>{console.log('this will not run until "task" is called with the start() method');},{scheduled:false});
Full List of node-cron Configuration Properties
Scheduled
scheduled:true/false
By default this is true and will register your job to start immediately.
Name your Task
name:'any-name-you-like'
The name is printed in logs which helps you identify where that particular entry came from.
node-cron can be setup to try and recover missed executions (eg, if your server restarts). I would advise caution with setting this to true. Otherwise, the default value is false.
recoverMissedExecutions:true
Schedule Multiple cron Times
node-cron allows you to chain multiple schedules to run the same job. Simply separate your cron values with a comma as below.
importcronfrom'node-cron';cron.schedule('0,15,30,45 * * * *',()=>{console.log('running every 15 minutes');});
Note that the comma separation (without spaces) applies to that particular entry in the cron specification.
Node-cron Specify a Range
To specify a range when you’d like your code to run then use the dash character:
importcronfrom'node-cron';cron.schedule('30-45 * * * *',()=>{console.log('running every minute to the 30th minute to the 45th');});
Node-cron Step Values (eg Every 2 minutes)
With the forward slash you can “divide” the range by a number. So in order to schedule something every 2 minutes at the start of the hour you could write:
importcronfrom'node-cron';cron.schedule('30-45/2 * * * *',()=>{console.log('Run a task every two minutes from the 30th minute');});
Node-cron Using Names for Months & Days
You can use month and day names instead of numbers if you prefer. Both full names and abbreviations work:
importcronfrom'node-cron';cron.schedule('* * * February,July Monday,Sunday',()=>{console.log('running on all Mondays and Sundays of February & July');});//ORcron.schedule('* * * Feb,Jul Mon,Sun',()=>{console.log('running on all Mondays and Sundays of February & July');});
Controlling node-cron, Methods
There are several handy methods that allow you to control the task you’ve setup.
Node-cron Schedule Method
We’ve covered this already. Simply sets up a task and schedules it.
cron.schedule('* * * * *',()=>{console.log('running every minute');});
Node-cron Start Method
If your task is setup and you choose the “scheduled: false” option then you’ll need to call start on the task to start the timer:
Any task can be stopped at any time. HOWEVER – exercise caution when using this programmatically. You may prematurely end a running task if you call stop. Best to thoroughly test this out and, of course, apply ACID principles so that you fail safe.
importcronfrom'node-cron';consttask=cron.schedule('* * * * *',()=>{console.log('will execute every minute, forever');});task.stop();
Validate Method
If you’d like to test the cron string before running it you can use the validate method: