This post is the once stop shop for you to see tech, software engineering and IT salaries from around the world. Simply click any link below to see what you should be earning! These are updated every year so you can get an idea of the progression, and extra cash, that you should be seeing!
Author: Grant G
-
How to Get a ChatGPT API Key
See below for instruction on how to get your ChatGPT API key.
What is ChatGPT?
ChatGPT is an AI language model developed by OpenAI. It’s designed to understand and generate human-like text based on the input it receives. Essentially, it’s a computer program that can carry on a conversation, answer questions, and provide information on a wide range of topics.
Foundation based on GPT (Generative Pre-trained Transformer)
ChatGPT is built on a series of models known as GPT (Generative Pre-trained Transformers). The most recent versions, like GPT-3 and GPT-4, are among the most advanced. These models are trained on vast amounts of text data from books, websites, and other sources, allowing them to generate coherent and contextually appropriate responses.
Capabilities of ChatGPT
ChatGPT can perform various tasks, including:
- Answering questions: It can provide explanations, summaries, and insights on numerous topics.
- Creative writing: It can help generate stories, poems, essays, and more.
- Problem-solving: It can assist with math problems, coding issues, and logic puzzles.
- Language translation: It can translate text between different languages.
- Conversational agent: It can engage in dialogue, offering advice, companionship, or just a chat.
Usage
People use ChatGPT for many purposes, such as learning, content creation, customer service automation, and even for entertainment. It’s integrated into applications, websites, and services as a virtual assistant, and it’s often accessed through chat interfaces.
Limitations
While ChatGPT is powerful, it’s not perfect and may sometimes provide incorrect or nonsensical information, lack understanding of context, or exhibit biases rooted in the data it was trained on. It’s also important to note that it doesn’t have real-time awareness of current events unless specifically trained or updated to do so (even though they claim GPT4 can search the internet!).
Ethical Considerations
OpenAI emphasizes the importance of using AI responsibly, ensuring that the information provided by models like ChatGPT is accurate and fair, while also protecting user privacy.
How to Find ChatGPT API Key?
You first need to sign up for a an OpenAI (ChatGPT) account. If you don’t have one then click here to register for one.
Once you have an account you can find your API key as follows:
- Login to your OpenAI account here: https://platform.openai.com/
- Click “Dashboard” in the top menu
- Click “API keys” in the left side menu
- Click “Create new secret key”
- Name your API key and allow it to have “All” permissions
- Click “Create Key”
Note that you will be shown the key only once so write it down!
-
How to Escape the 9 – 5 Prison. Developer Millionaire.
Have you ever felt trapped in your 9 to 5 job? I know I used to and every single day I wondered if it was possible to escape.
Fast forward 10 years and I’m now an entrepreneur who owns his time, but I certainly didn’t start that way.
In fact my starting position was probably like yours, just about covering my bills with a 9 to 5 JOB (Just Over Broke).
This is the story of how I went from that job to a $12,000 freelance contract in just 4 weeks. You may be thinking that I had amazing skills to have someone pay me that amount of money…
You couldn’t be further from the truth.
I was a complete beginner when I started applying for contracts and, as I would learn, this fact did not matter one little bit.
Read on to see how I escaped my 9 to 5 prison and how you can too, even if you have very little to offer.
What’s Your Catalyst?
Every great prison escape has a catalyst, some small event that finally breaks the camel’s back and commits you to change.
For me it was my former boss.
I used to work hard at my job for just 2 hours a day. That was all I needed to output the same as my colleagues so I figured I was doing OK. The remaining 6 hours I would research “get rich quick” schemes (all of those failed by the way).
One day the big boss calls me in, holding a stack of printed papers:
“The IT department has sent me a report of everything you’ve been doing on your laptop that’s not work related….”
I’ll spare you the details but I got an “official” warning that day. After the shock wore off I asked why I was being reprimanded. After all, my work was high quality and always on time. His response?
“We expect you to work for the company whilst you’re at work.”
Translation: You will work as hard as possible for us so we get rich. We own you for 8 hours every day. Do not use that time to enrich yourself.
This attitude from the higher ups of “never enough” really p*****d me off. I knew something had to change.
I bet that you’ve experienced something similar.
Ever wasted a whole day doing nothing important except trying not to get caught by your boss?
Ever been at a meeting and thought “What a bunch of morons. I can do so much better.”?
You may think that being surrounded by idiots and achieving nothing isn’t harmful, but it is. You are slowly being dragged down to their level and becoming one of them, but there is hope.
When you have these thoughts, hold on to them. They are your catalyst of change.
You Must Act Fast
At this point it’s vital to act fast before these thoughts fade. You have 2 choices:
- Sit there and take it like a good little inmate or…
- Make a plan to escape
You’re here because I think you want option 2, to escape as I once did.
Escaping Prison is Not Easy
I can hear your objections already:
- How do I start?
- How do I find clients?
- Who will pay my bills?
I had all these fears and more. The way was not clear at all. I hopped between ideas, never fully committing to any one thing. In fact I even had nightmares about being jobless and broke.
Pain Makes You Move
At my job the prison guards were watching me ever closer, making sure their inmate worked for the maximum 8 hours a day. This new level of micromanagement kept me frantically searching for that escape tunnel.
After much procrastination I decided to try freelancing, due to the fact I could get paid a hundred dollars an hour (in theory).
I had only one skill to offer though – very basic coding. It was so basic that I thought that no-one would ever hire me. In fact the more I thought about it, the more hopeless I felt, but my situation forced me to try.
Hopeless and Depressed is Normal
If you plan on freelancing then know this: You will feel completely hopeless and depressed at the start.
During hard times I like to think of the famous escape scene in the film: Shawshank Redemption. The main actor chisels for months through hard rock, crawls through a mile of sewage tunnel and emerges outside the prison, looking and smelling inhuman.
But he is free.
We humans prize freedom over all else but would you crawl through miles of sewage to get it?
How I Escaped and You Can Too
With my prison guards keeping an ever tighter watch I sneakily applied to over 50 job posts on freelance platforms. Eventually one client replied (yes, only one).
He wanted an Android demo where you could record rapping over a backing track. He was only paying $250, which was far too low, but I had no choice. I took it on.
It turned out to be a nightmare technical problem which took me 4 days to solve – resulting in a grand $8 per hour. But you know what?
I WAS HAPPY!
I had built something on my own time, gotten paid and had the beautiful beginnings of my tunnel of freedom.
If you decide to create your own tunnel of freedom then you will never forget this first taste of free air.
You will feel elation in a way most people have not and never will.
Are You Professional? Does it Matter?
The demo app I delivered had that one recording function but it was a mess of third party libraries and buggy code. 100% certified BEGINNER level code.
But you know what? The client was extremely impressed. After all, he could barely login to Facebook without losing his way and coding was black magic to him.
From this I learned that your expertise only needs to be a certain distance ahead of the client to seem extremely impressive.
However there was one little problem – I was being paid too little. High off the success of my first completed contract I turned to solve this new dilemma.
Pay attention because this section is extremely important for your success.
The Fear of Moving from $8 to $80 per hour
You will struggle with this step of the journey. Lord knows I did. The reason is down to human nature.
We humans are anchoring creatures. That is, once we define some part of life or create a habit then it becomes an anchor to reality.
This is not a bad thing as we need anchors in life to be happy. However, they also hold us back.
I’ve found that the greatest “hack” in life is to realise which anchors are holding you back and make a plan to replace them with newer, bigger, better ones.
Upping my rate from $8 per hour to $80 per hour required me to cut away that old anchor and create a new anchor to drop.
Make no mistake, this process is scary. You’re risking $8 to make ten times that, but if you lose then you make nothing at all.
How You Get Paid More
Once I had shown my value with my black magic coding skills (held together with duct tape), the client wanted to engage for a fully published app.
I started having phone calls with the client, not just to be helpful, but also because I wanted to see if he was serious and had the money to back it up.
I was being selfish.
I don’t mean selfish in the incorrect way it’s used today: “I’m a horrible person who never thinks of others”. No, instead I mean the classical definition of selfish in that you prioritise yourself and your needs.
You need to find a client who will pay and not waste precious time. You only do that by having your own ideals and prioritising them.
How to Know if Your Client is Serious
In my discovery calls with the client I found out that he was backed by a retired entrepreneur who gave off a rich vibe. Not “I drive a Rolls Royce” rich. No, I mean he had a deep tan that only someone with much leisure time could achieve. He also wore nice clothes, not with garish logos like Armani wannabes, but really high quality with subtle branding.
However what really sold it for me was his character. He was very open and willing to discuss any aspect of the app including costs, business model, ongoing expenses etc. Clearly, he was very experienced.
You need to keep an eye out for such people. If you can provide a valuable service they are a reliable financial ticket out of 9 to 5 and you can learn a lot from them.
How to Charge Your Worth (Quoting for Work)
After these discovery meetings it was looking good so I promised a quote.
This was the most painful and agonising thing I have ever done.
You see, I wanted to charge my worth but I was afraid. What if he didn’t accept my prices? What if he told me I was trying to rip him off?
I spent 2 days trying to guess an acceptable price and eventually settled on $6,000. My girlfriend looked at the number and, like good women do, said it wasn’t enough. I quickly doubled it to $12,000 and sent it before I could change my mind.
Sometimes you just have to press send and let the gods decide.
The next 16 hours were agonising! Would he accept? Would he try to knock me down? Would he ghost me?
Would I be banished back to my daily prison sentence, working under the unforgiving gaze of my job prison guards?
Will Your Client Accept High Prices?
Within a day the client replied to my quote, saying “That’s fine, when can we start?”.
Just. Like. That.
The next day a deposit of 3 grand arrived via old school cheque. I
quickly walkedran to my bank to cash it before the client cancelled everything!Then I went to the Apple store.
I picked out a brand new MacBook Pro, and my favourite part? When the assistant asked me if I wanted a payment plan I simply said, “No thanks, I’ll just pay cash”.
God, that felt good.
Can you imagine doing the same thing with your first well deserved freelance payment?
That’s where I’ll end this story but suffice to say my escape tunnel was successful and this story was the starting point.
Do You Know Why the Escape Plan Worked?
It’s time to extract the important parts of this story so you too can construct a successful escape plan.
1. No customer wants a big quote before they know you
With a low risk $250 job I first proved myself to the customer. This is easy to see looking back but at the time I thought the amount was far too low. I almost didn’t apply!
If you’re just starting out then you can take a few low paying jobs if that’s all you can get. You need the experience and you never know where it will lead!
Raised rates come later, you must pay your dues first.
2. ABT. Always. Be. Talking.
Your customer wants to know that both his project and money are in good hands, but he’s not a psychic. He can’t just ask a crystal ball what you’ve done this week.
You must always be talking with your customer. Don’t just discuss technical aspects either. Also discuss the business, revenue model, financials etc.
If you do all the above right then you will build a solid relationship. Once established your customer will be happy to pay the going rate and more.
And the most important part? If someone tries to undercut you they won’t succeed, because your successful life is built on relationships, not the cheapest quote.
3. SLOWLY Build Your Escape Tunnel
Finally, you cannot rush the process! I had to hit 50 personalised applications before one single reply.
You are playing a time and numbers game. Lots of contract applications and lots of time will pass by before success.
Having said that, when you look back, it won’t seem very long at all. I did it in 4 weeks, but that felt like an eternity at the time!
Remember, every great prison escape was done over a long period. No matter how bad your skills and small your tools you can bring down a 6 foot stone wall, given enough time.
Did I Make More than 12k?
Oh yes I did! In fact the 12k contract was just the start. My second client added another 28k and it all grew from there.
To get those stories, and much more, then check out my Freelancing Guide on iamdev.net
-
MASTER bun Elysia by Creating a Server – Guide
Elysia Framework
This article will show you how to create a server using the bun Elysia Framework. By the end you will know about the following features:
- Understand the bun Javascript Runtime to create an api
- Basic setup and server scaffolding
- Get requests with URL parameters
- Post requests with body data
- Architecture for organising your routes
- Sending responses to the end user
I won’t cover anything generic such as database connections so that we can concentrate on the topic at hand. That said, it’s important to remember that bun is a drop in replacement for node js, so any business logic you need can simply be copy pasted from a node implementation with zero compatibility issues!

If you want even more bun goodness then check out my bun course Setup bun Elysia App
The first step is to setup bun and create the Elysia app.
- Open up Visual Studio Code
- Open your working folder with “File => Open Folder”
- Open a terminal with “Terminal => New Terminal”
- In terminal type: “bun create Elysia myApp” (myApp is the name of your app)
- Follow the onscreen instructions, simply accepting the defaults
Run Server
Now that your Elysia server has been created you should test it out. By default an npm script to run the server should be in package.json under the scripts section:
“scripts”: {
“test”: “echo \”Error: no test specified\” && exit 1″,
“dev”: “bun run –watch src/index.ts”
},If this is not there then go ahead and add it. Then in your terminal, build and create the Elysia instance:
npm run dev
You should see “Elysia is running at localhost:3000” in the terminal. Use your browser to go to localhost:3000 and you should see a welcome message corresponding to what’s in your index.ts server declaration code. At this point you may also want to check out my guide on hot reloading natively.
Create a Get Route
Before we start, a word on architecture … one option to create your get route is just to place it straight into the index.ts file but after adding a couple of routes that would really clutter up the index file!
Let’s use good architecture practice instead:
- Create a “routes” folder in the “src” folder.
- Create a “shop.ts” file in that routes folder.
This shop.ts file will hold all the routes corresponding to our pseudo online shopping server. Open that file and paste in the following code:
import { Elysia } from "elysia";

const shopRoutes = new Elysia({ prefix: '/shop' })
.get('/', () => 'HOME PAGE for shop, welcome')

export default shopRoutes;
A couple of notes on the above code:
We first import the Elysia class as it contains everything we need to define all things “server”. Then we define a constant called “shopRoutes” which will hold all of our routes.
This takes an optional object in which we can define things such as the URL prefix. In this case we have defined “/shop” so this route group will only be called if the URL entered has this form:
Eg: localhost:3000/shop
You should have noticed that the server auto reloads when you save any code. The –watch option in the dev script watches all our code, automatically reloading when required!
Although if we tried this route now it wouldn’t work as we need to specify that these routes exist in the index.ts file.
Add Route Groups
Open up the index.ts file and clear out all the boilerplate code. Paste in the following lines:
import { Elysia } from "elysia";
import shopRoutes from "./routes/shop"

const app = new Elysia()
app
  .group('', (app) => app.use(shopRoutes)) //ADDITION OF ROUTE GROUPS
  .listen(process.env.PORT || 3000);

console.log(
  `🦊 Elysia is running at ${app.server?.hostname}:${app.server?.port}`
);
Our “shopRoutes” are imported at the top of file which can then be used the .group function. This registered those routes with the main Elysia object.
Now open up any browser and navigate to localhost:3000/shop to see your bun GET request in action!
Add URL Parameters to a GET Route
On a bun server you will need a way to retrieve data based on some variable passed in from the client.
For example, in our shop we may want to retrieve a product based on a code or product name. Usually this is specified in a GET route using a URL parameter, ie a subsection of the URL. The example below will take the last part of the URL as a variable which is used to find product information and return it:
myshop.com/shop/butter => Should return a page for butter
myshop.com/shop/ribeye => Should return a page for ribeye steakThis is pretty easy to implement in bun. Let’s open up the routes/shop.ts file and add a second GET route as marked below:
import { Elysia } from "elysia";

const shopRoutes = new Elysia({ prefix: '/shop' })
  .get('/', () => 'HOME PAGE for shop, welcome')
  .get('/:item', ({ params: params }) => "Returned data for: " + params.item) //ADD THIS LINE

export default shopRoutes;
Test it out by going to localhost:3000/shop/shampoo. You should get “Returned data for shampoo” in your browser!
Let’s now step through this GET request so you understand it fully. The URL is defined as having a variable with the colon character ( : ).
Any name after that will be the variable name but you have to explicitly pass the params to the response function! This is done with the { params: params } argument, then the anonymous function will have access to your variables.
Note that the above is a shortened version of reality. You would normally be doing a database lookup somewhere based on the variable (usually an id that is passed over).
Create a POST Route with Body Data
As you probably know POST routes differ from GET routes as the former sends structured data along with the request. Usually this data would be too complex to include in a bun GET parameter so instead is bundled into the BODY of the POST request.
Using the routes/shop.ts we already have in place we will add a POST route that allows us to send over some data about a users cart. Start by adding a route as below:
import { Elysia } from "elysia";

const shopRoutes = new Elysia({ prefix: '/shop' })
  .get('/', () => 'HOME PAGE for shop, welcome')
  .get('/:item', ({ params: params }) => "Returned data for: " + params.item)
  .post('/cart', ({ body }) => JSON.stringify(body)) //ADD THIS LINE

export default shopRoutes;
Now there are tools in Chrome that you can use to send a POST request but for sake of speed we’ll issue a curl command (on Linux / Mac). Simply copy and paste the following into your terminal:
curl localhost:3000/shop/cart -X POST -H “Content-Type: application/json” -d ‘{“id”: “Bread”, “count”: 9}’
When we send over our CURL request when also send some body data with the type “application/json” (defined in the header -H). The body data is defined after the -d flag in the curl command.
Our bun application picks up the body, converts it to a string using JSON.stringify and sends it back to us. In reality you’d actually use this data to calculate the cart price or whatever your application needs.
Finally
If you liked this then you’ll love my full bun and Elysia course.
Appendix: Full Code
Here’s the code from index.ts
import { Elysia } from "elysia";
import shopRoutes from "./routes/shop"

const app = new Elysia()
app
  .group('', (app) => app.use(shopRoutes))
  .listen(process.env.PORT || 3000);

console.log(
  `🦊 Elysia is running at ${app.server?.hostname}:${app.server?.port}`
);
And here’s the code for routes/shop.ts
import { Elysia } from "elysia"; const shopRoutes = new Elysia({ prefix: '/shop' }) .get('/', () => 'HOME PAGE for shop, welcome') .get('/:item', ({ params: params }) => "Returned data for: " + params.item) .post('/cart', ({ body }) => JSON.stringify(body)) export default shopRoutes; -
Full GUIDE: Path Module in Node.js
1. Introduction
The path module in node allows us to work with files and directories. Everything you can do with the command line (or a mouse) can be done with the path module.
This blog post aims to be the vest resource out there and includes my experience as a long time node developer. If you have some tips and tricks then please leave a comment!
It’s important to note that the path module is generally platform independent, not caring what flavour of linux, windows or Mac you’re on, although typically you’re probably running Centos / Ubuntu or some other server flavour of linux.
However, just because it’s generally platform independent doesn’t mean that you won’t have issues, especially around file access permissions! Typically the process running node also needs full access to the directories you’re working with. If you get errors then permissions is usually the culprit.
Another thing to be aware of is that some commands return default directory separators for that particular operating system. Eg double backslash (\\) in Windows or single forward slash in *nix (/). Where that’s the case you should probably use the following classes:
path.win32.[your_function] which gives you double backslash separators no matter the system OS.
path.posix.[your_function] which gives you single forward slash separators no matter the system OS.
For the remainder of this reference article we will assume you’re running on some flavour of Linux server and won’t be switching between the two. If you do have to support multiple environments then just be aware of the above.
2. Information from Directory or Path
A very common use case you’ll come across is to get certain pieces of information from a file or directory. Typically you’ll mostly want the file name. Let’s take a file location such as:
/var/www/html/data/private_diary.txt
It’s very common of the beginner to think “just split the string by the / character and take the last member of the array as the filename”. Yes, you can do this but some operating systems use backslash directory separators. That means more complex code and no guarantee your code will run on another OS.
Instead, node:path has this figured out already! You can use the following:
path.basename(path, [ext])
This method allows you to extract the filename from a path, eg:
path.basename(/var/www/html/data/private_diary.txt) => private_diary.txt
You can also tell path to remove the file extension but you have to know (or query) the file extension beforehand:
path.basename(/var/www/html/data/private_diary.txt, “.txt”) => private_diary
This extension removal function is case sensitive so be very careful. Normally that’s not an issue as most extensions are lower case but could be a gotcha in your case.
Personally, if I need the extension then I tend to use a string.split by period character. The last member of the array should be the extension (or if no file extension is present then there should only be one member in array, in which case there’s nothing to do). Alternatively you can use the extname method detailed later in this article.
path.dirname(path)
This method allows you to retrieve information about the path preceding the file name. Eg:
path.dirname(“/var/www/html/index.ts) => /var/www/html
NOTE: The final directory separator ( / ) is not included in the result!
path.extname(path)
This method retrieves the extension of the file (after a period character):
path.extname(/var/www/index.ts) => .ts
NOTE 1: This method returns the period as well! Result from this can be used as the second argument in the path.basename function to strip the filename extension.
NOTE 2: If there’s no extension then this will return an empty string, so you may want to check for that.
NOTE 3: If the file name has only a period without extension eg: “myfile.” then a single period “.” will be returned.
NOTE 4 (important): If the path starts with a period eg: “.myfile” then you will get a blank string returned (GOTCHA!).
I find you need to really validate results with this method to be sure you’re getting what you expect, especially if you have uncontrolled user inputs.
path.parse(path)
Takes a path and breaks it up into constituent components accessible as properties:
path.parse(‘/var/www/site/key.txt’) will output an object with properties:
{ root: ‘/’,
dir: ‘/var/www/site’,
base: ‘key.txt’,
ext: ‘.txt’,
name: ‘key’ }I use this function quite often as it abstracts away all the issues around breaking down the constituent components of a path.
path.isAbsolute(path)
This method checks if the path passed in is absolute (by comparing it to the root of the filesystem), eg:
path.isAbsolute(‘/var/www/file.txt’) => true
path.isAbsolute(‘/www/file.txt’) => false3. Manipulating and Creating Paths
path.join([…paths])
This method takes multiple paths and combines them into one path.
Despite the documentation syntax indicating an array you do not pass an array into the argument. Instead it expects a comma separated list of strings:
path.join(‘/foo’, ‘bar’, ‘baz/asdf’) => /foo/bar/baz/asdf
Note that if you include a delimiter ( / ) then the function will pick that up as a preconfigured path segment. Be very careful of adding posix command strings such as “..” which means to go back one level in the path, eg:
path.join(‘/foo’, ‘bar’, ‘..’) => /foo
For the above you might expect /foo/bar but addition of the “..” command makes it go back one directory!
path.resolve([…paths])
This method provides an absolute path from the paths passed in. If the first path does not include the path delimiter ( / ) then the current working directory will be added to the start of the resulting path. Eg, if your current directory is /home/user/:
path.resolve(“www”, “index.ts”) => /home/user/www/index.ts
However, note that the current working directory will not be added if you include the delimiter in the first argument:
path.resolve(“/www”, “index.ts”) => /www/index.ts
path.normalize(path)
This function trims any trailing slashes or period characters to clean up your path string, eg:
path.normalize(‘/var/www/../index.ts’) => /var/www/index.ts’
4. Bonus: Other Useful path Properties and Classes
path.sep
This property returns the current path separator depending on operating system ( \ or / )
path.win32
You can use all of the methods in this post but this class will return Windows specific versions of the results (even if you’re on another OS).
path.posix
You can use all of the methods in this post but this class will return Linux specific versions of the results (even if you’re on another OS).
5. Wrap Up
There are many useful methods in node:path but there are also many gotchas if you plan on running cross platform. If that is you then test, test, test to be sure the output you’re getting is what you need! Personally I have all my paths run through the posix class (section 4) so I have no issues with delimiters. Then all you need is to be sure of absolute directories as they are different on Windows / Nix / Other.
Finally, if you enjoy this post then one of these 2 posts might interest you:
-

Ultimate Guide: Asynchronous vs Synchronous in Javascript
This article aims to be the most comprehensive guide to asynchronous vs synchronous in Javascript. This is a very easy topic to understand once you actually know it. And there’s the problem, every single programmer sucks when trying to explain it!
I will initially explain these concepts using the analogy of a shopping trip, which consists of one or more people and a long shopping list.
As I proceed from synchronous to asynchronous concepts, I will weave in the history of processor development. I feel this is important for beginners to know as it gives you the right context around why we try to async almost everything these days.
Finally, we will run through the history of sync vs async code, using mostly Javascript, but also some pseudo Javascript to make things clearer.
Note: There are many nuances on this subject, not least of which is that of CPU architecture. I won’t be touching on the latter, instead simplifying it so you can really understand sync vs async. In fact even simple processors can do clever stuff with a single core but in this article I will treat them as dumb “single task” machines.
Synchronous Programming
What is Synchronous Programming?
Synchronous programming is simple to understand as it works in a linear fashion, the same way our brains do:
Synchronous programming means that a list of computation tasks happen in the order they are defined.
If you have a list of tasks then each one gets fully completed before the next one is even started. Your program will proceed down the list of tasks in this manner, never executing anything out of order.
Synchronous Programming Explained
Let’s start this section with a simple shopping analogy whereby I have a shopping list with 2 items on it, milk and bread.
At the store I cannot get milk and bread at the same time, therefore I must fetch each item sequentially. If my shopping list were to expand to 100 items then the shopping trip would take 50 times as long (ignoring walking and paying time etc).
The basic rule is thus: As long as I’m the only person doing the shopping then each doubling of the list doubles the time required, no matter what.
In programming this is the same as having a single processor (CPU) with one core (sometimes referred to as a thread). This means there is only one worker that can execute code and only one task can be running at any given time.
This single worker concept is where the idea of synchronous code comes from. One worker with one list of tasks needs to do them in a defined order.
Example of Synchronous Code
let todayPrice = getTodaysExchangeRate()
let yesterdayPrice = getYesterdaysExchangeRate()
let deltaPrice = today - yesterday
The above code is synchronous and runs strictly in order, each line completing before the next:
- Get todays exchange rate from an external service (API), then store it in “todayPrice” variable
- Get yesterdays exchange rate from another API, then store it in “yesterdayPrice” variable
- Subtract one from the other and assign the answer to the variable called “deltaPrice”
Now this is a very simple piece of code, but there’s an issue you may have spotted. The services fetching prices may rely on another server across the world. A call to that server could take 2 seconds to return a result which means you wait 4 seconds in total for all results.
As the average attention span is 2 seconds, you’ve already lost your user to YouTube before you even start on the second call!
Negative Impact of Synchronous Code
Imagine if you have a financial trading program and are requesting prices multiple times a second. You could lose millions of dollars in a trade because a server somewhere took 100 milliseconds too long to respond!
Or, if creating a game that runs on a single CPU, you need to prioritise either running the game or reading assets and textures from a disk for the upcoming level. The well known solution for this is “level loading”.
Or, if you have an app that continuously fetches data from disk then it would wreck the user experience, causing stuttering and annoying pauses.
So what’s the solution for running multiple tasks at once? Let’s start by looking at the evolution of processors.
Moving on from Synchronous Programming
Decades ago most processors could generally only run one task at a time (not totally true *) so synchronous programming was a natural fit. After all, if your CPU can only run one task then you cannot have anything running in parallel.
In 2002 that changed when Intel introduced hyper-threading. Hyper threading basically allows you to run 2 processes on one CPU core. This invention allowed the average consumer PC to run multiple instructions at the same time.
Shortly after that Intel even started producing multicore processors, dramatically increasing the thread count. Now you could now run 4x, 8x etc the instructions in parallel.
* Aside: Technically, multi-threading has been around since the 1950s with IBM etc but that hardware was very expensive and specialised.
* Aside 2: CPUs can have multiple “circuits” inside of them, each handling something specialised. Video decode and encode is one example. That’s why your laptop can play a lot of YouTube on battery as the specialised circuit uses very little power. However we’re ignoring this for sake of the article.
* Will the asides ever end? : If your CPU is fast enough you may not actually even notice multiple operations on one core (if the CPU has a decent instruction set). Hence the never ending race for faster and faster processing frequencies.
More Processor Cores. More Workers.
Following Intels multicore multithread revolution we now had multiple workers to do our evil code bidding. To understand why this development was utterly amazing, this let’s go back to our shopping analogy.
Shopping Analogy: If I’m one guy in a shop with one trolley and a 100 item list, I need to fetch everything myself. But if I now have 2 people on the shopping trip I can assign one task to each person to run in parallel and, in theory, we can complete the shopping trip in half the time.
Fundamentally, this increase in cores and threads is where the concept of asynchronous programming started to appear in the mass market *. If you have multiple CPU workers dividing up the task list then you can run things a lot more efficiently.
* Async coding has actually been around for a very long time, but the average developer only really got exposed to it in the early 2000s.
Asynchronous Programming Overview
What is Asynchronous javascript?
Asynchronous simply means that a list of tasks gets split between multiple workers, each executing its list at the same time as the other workers, without blocking any of the other workers from doing their tasks.
Async Javascript Explained
With the advent of multiple cores and threads, software engineers could now sub-divide their code to be split among the workers.
Each worker would take its list of tasks and process it in parallel to the other workers. In the end all the workers would return their results to be used in the next stage of the program.
A simple example may be fetching ticker prices for stocks. Let’s say you have 100 stocks that you’re watching and each price fetch takes 100 milliseconds (which is really fast). Without async programming that would take 10 seconds on a single core CPU. Clearly no good for us advanced traders…
Now, with multi core CPUs, we can assign those tasks over 16 threads, reducing the time to about half a second. This is sometimes referred to as a microtask queue.
Please note that I am grossly over simplifying this process – a network call doesn’t actually tie up the CPU thread whilst it is running!
Importance of Asynchronous Code – Time Saving
Clearly, running tasks to fetch price in a parallel manner will save us a lot of time! Nowhere is this more important than on a server. If you have a thousand users connecting every second then you want 2 things:
- As many CPU threads as possible to answer simultaneous requests immediately
- Fast CPU clock speeds to give users a result before they get bored and go to YouTube
This is why you see monster multicore server CPUs selling for tens of thousands of dollars. For example, Intel’s newest architecture will produce 288 core CPUs! This is called “vertical scaling” and allows each server to scale up to fulfil more and more requests.
However, there is a limit to vertical scaling. No matter the CPU you can’t serve millions of requests per second – that’s when you need horizontal scaling. But that’s a different kind of architecture beyond the scope of this article.
Asynchronous Javascript – How to Use It
Now that you understand sync vs async you’re in a good position to deep dive into a real understanding of async code. If you need a little more prompting then I’ve also written a very simple guide on the advantages of async vs sync.
In this section we will look at real coding techniques using mostly Javascript to show examples. However, the principles I’m about to show you apply to pretty much all modern languages and frameworks with very little variation.
As with the preceding text we’ll move forward in an historical manner, going over async techniques from previous years. These older techniques will provide you the necessary context so you can fully understand modern coding paradigms like async / await.
Async – Which Worker Organises the Workers?
One thing to cover before we go on is who controls the worker threads? This is generally another CPU thread (sometimes called the main thread – or controller / dispatcher). This thread is from where the tasks are sent to other workers.
The main thread as where you manage your program flow but do none of the heavy lifting.
Generally speaking, different threads of work cannot communicate with one another as each is its own universe. So, if something is calculated by one thread then it cannot share that result to another worker thread. Instead it uses something called a callback, which communicates back to the main thread.
Callbacks – Asynchronous Programming
So, we now have multiple workers doing multiple tasks in parallel, orchestrated by a main thread. The question is – how do we know when a worker finishes a task and how do we get hold of the result?
One of the first answers to this problem was the “callback”. Simply put – when the worker thread finishes its task it calls back to the main worker task with the result.
A callback is usually defined by passing in a function to the arguments when you start the long running task. When the main thread receives a callback it executes the function you passed in.
Callback Function – Code Example
Let’s now convert our synchronous code from earlier into callback based code. Read the below code very carefully including the comments (lines marked //) to understand what’s happening.
let todayPrice = null

//the following function executes WITHOUT waiting for a result. The computer simply sets the task going and IMMEDIATELY moves on to the next lines of code. The section between the curly braces {} is a function that's passed in. It's only executed when getTodaysExchangeRate calls back with a price.

//This type of function is known as an "anonymous function". In Javascript it is generally defined in the format:
// (callbackData) => { code to execute }
getTodaysExchangeRate((price) => {
  this.todayPrice = price
})

let yesterdayPrice = null

//the following function also executes without waiting for a result. The computer simply sets the task going and IMMEDIATELY moves on to the next line of code
getYesterdaysExchangeRate((price) => {
    this.yesterdayPrice = price
})

//The following code checks every 50 milliseconds to see
//  if the results are in yet from the callbacks.
//FYI: "setInterval" allows you to endlessly loop code every x milliseconds

//When the results are in then it prints the delta price to the console
//Note that this is also a callback function!
setInterval((todayPrice, yesterdayPrice) => {
  if (todayPrice && yesterdayPrice) {
    let deltaPrice = today - yesterday
    this.showDelta (deltaPrice)
    endInterval() //stops running this checking function if prices are in
  }
}, 10)

function showDelta(deltaPrice) {
  console.log(deltaPrice) //print price to terminal line
}
The above code is extremely simplified to be readable by the new programmer so isn’t technically how you’d do things. However, it demonstrates the point I’m trying to make.
The asynchronous order of operations is:
- a) getTodaysExchangeRate ( ) goes off to fetch the price on the first processor thread. When it gets the result it will assign it into the “todayPrice” variable
b) The program will immediately go the next line of code without waiting for the result (as it knows that’s coming later)
c) getYesterdaysExchangeRate ( ) fetches yesterdays price on a second thread. When it gets that result it assigns it into the “yesterdayPrice” variable
d) Without waiting for any of the above to complete, a function checks for the results every 50 milliseconds (also looping asynchronously with a callback) - If both results are present then we run the deltaPrice calculation and show it in the command line.
Note: There are much better ways to check for results of multiple asynchronous operations, rather than polling them as we’re doing with setInterval. The above code just makes the concepts easy to understand.
Note 2: Yes I’ve seen polling of async results. Yes, I’ve done it myself. We were all beginners once so don’t beat yourself up if you’ve done it!
Note 3: Code will not technically happen on a new thread for each task, as that decision is taken by your operating system (generally). However, we’re treating it as though it would.
Callback Hell (Pyramid of Doom) – Avoid This
Sometimes you need the result from an async call before you can proceed with the next part of your code.
You would come across this, for example, if you want to make sequential server calls after a user has logged in to your app. You’d perform a series of data fetches for population of app content.
In the below code we’re going to call up 3 async operations that need to be executed in order. You may wonder why we don’t just use synchronous code for this…but remember that would impact the main thread… hence, pretty much ALL of your sequential long running tasks should be offloaded to other threads.
In the below example, after each async function runs, we use the callback function to trigger the next async function. Therefore we have a stack of 3 operations which results in nested callbacks (aka: pyramid of doom):
Note that in this example we’re just faking the call time with setTimeouts lasting 1 second:
// Example of callback hell

//START - 3 functions that simulate a long running call
function asyncOperation1(callback) {
  setTimeout(function() {
    console.log("Async Operation 1 completed");
    callback(null, "Result of Async Operation 1");
  }, 1000);
}

function asyncOperation2(callback) {
  setTimeout(function() {
    console.log("Async Operation 2 completed");
    callback(null, "Result of Async Operation 2");
  }, 1000);
}

function asyncOperation3(callback) {
  setTimeout(function() {
    console.log("Async Operation 3 completed");
    callback(null, "Result of Async Operation 3");
  }, 1000);
}
//END - 3 functions

// Nested callbacks, each one depending on result of previous.#
asyncOperation1(function(error1, result1) {
  if (error1) {
    console.error("Error in Async Operation 1:", error1);
    return;
  }
  console.log(result1);

  asyncOperation2(function(error2, result2) {
    if (error2) {
      console.error("Error in Async Operation 2:", error2);
      return;
    }
    console.log(result2);

    asyncOperation3(function(error3, result3) {
      if (error3) {
        console.error("Error in Async Operation 3:", error3);
        return;
      }
      console.log(result3);

      // More nested callbacks could be added, leading to further indentation and complexity
    });
  });
});
The above code is horrendously hard to read with just 3 callbacks! Imagine if we had 10 of them! Therefore we need a better way to do this. Enter promises ->>>>
Avoid Callback Hell with Promises
A promise is not much different from a callback (it essentially is one) but they are much more manageable. In the previous callback examples we polled results every 50 milliseconds or had nested callbacks but clearly those are not optimal solutions.
With promises we can leave the polling and notifications to be managed by the promise module itself.
Promise definition: A promise is a function that promises to return something in the future.
Promises are such a good fit with the async paradigm that there are promise type libraries available for most languages. For example, in Javascript we would use the natively included promises module.
Let’s now see how they work with some sample code that does the following:
- Fakes a long running task
- Creates 5 of those tasks at the same time
- Uses Promise.all() to callback when all results have been fetched
- ONLY prints the results if they are all successful.
// Function representing a long running task that returns a promise
function asyncTask(id) {
  return new Promise((resolve, reject) => {
    // Simulating asynchronous operation
    setTimeout(() => {
      console.log(`Task ${id} completed`);
      resolve(`Result of Task ${id}`);
    }, Math.random() * 2000);
  });
}

// Creating an array of tasks that will run simultaneously
const tasks = [
  asyncTask(1),
  asyncTask(2),
  asyncTask(3),
  asyncTask(4),
  asyncTask(5)
];

// Using Promise.all() to start and execute tasks in parallel
//. and ONLY call back when they are ALL complete
Promise.all(tasks)
  .then(results => {
    console.log("All tasks completed successfully");
    console.log("Results:", results);
  })
  .catch(error => {
    console.error("One or more tasks failed:", error);
  });
Notice how there are no callback indentations littering our code. The only indentations are to catch errors thrown by a failed promise result (using then, catch). This code is also a great example of ACID principles. Using the promise results, you either pass (if all succeeded) or fail (if even just one failed).
This example would be typical if writing to a database. You would want the 5 writes to all be successful to keep data consistent. If one write should fail then you roll back ALL the writes and retry.
Promise libraries can be architected in all kinds of different ways, for example, if you prefer to inspect or use the result from each promise callback in a chain….
Chaining Promises
To chain a list of promise tasks we use the “then” syntax, passing in a success and failure function to handle each condition. The below code chains 3 long running tasks, allowing you to inspect the result at each stage and decide whether to continue or not.
const myPromise = new Promise((resolve, reject) => {
  setTimeout(() => {
    resolve("foo");
  }, 300);
});

myPromise
  .then(handleFulfilledA, handleRejectedA) //pass in 2 functions that do something according to success / error
  .then(handleFulfilledB, handleRejectedB)
  .then(handleFulfilledC, handleRejectedC);
There are many, many ways to use promises depending on your needs. If you have a special case then your best option is to see the documentation for your particular promises library.
Finally, promise syntax is a lot cleaner than callbacks but there’s still a little indentation and you may need to cross scope to store results. We have finally reached what you’ve been waiting for, async and await.
Asynchronous Programming with Async & Await
No doubt you’ve heard of async / await and is what you’re here for. This is where we currently are in terms of state of the art with async programming (although it’s actually over 15 years old now!)
First, lets recap a little of what you’ve read so far, to understand where we are:
- Async programming grew to take advantage of multiple CPU threads
- Multiple tasks could now run in parallel
- We can track multiple tasks using promises or similar paradigms but they’re not perfect
The above solutions solved some issues but presented their own problems:
- Code is more readable with promises but it’s still prone to nesting and a bit difficult to decipher right away, especially for other people on your team.
- Storing results from the callback means you need to cross scope which can create some funky errors.
- Responsiveness of your app or server can suffer when you accidentally run async operations on the main thread (rare but can happen).
Theoretical solutions to these would be to:
- Have few to no indentations in our code (more readable and fewer scoping issues)
- Automatically take care of moving heavy loads off the main thread (without having to think about it).
Note: Async / await didn’t appear due to responsiveness or readability issues. It was invented as part of F# and C# as their solution for callbacks / long running tasks. But I have artistic license because it’s my website 😉
How to Use async / await
Below we will fetch some data from a text file on disk to introduce async / await concepts. Read the comments in the code to see what’s going on.
// Define a function with the "async" keyword, which allows it to be "awaited"
// This function returns a promise that resolves some text after 1 second
async function getPriceHistoryFromTextFile() {
  return new Promise((resolve, reject) => {
    setTimeout(() => resolve("Price = $4.56"), 1000)
  });
}

//define a second async function that will call the above function and alert the result
async function printPriceHistory() {
  // The line below calls our long running function from above
  // MAGIC SECTION: The "await" keyword  tells our program to suspend execution of this particular thread of code until a result is received from the callback
  // This leaves the main thread free!
  let result = await getPriceHistoryFromTextFile()

  alert(result) // result fetched from above line, resume execution of code
}

printPriceHistory()
The basic principles of async await code:
- Any long running function that will complete at some unknown point in the future should be marked with the “async” keyword
- When you call that function you prefix it with the verb “await”
- Await tells the program to suspend code execution until the async operation returns a result
- This leaves the main thread free!
As you can see this code produces no indents, no manually managed crossing of scope and is much shorter and readable.
What’s more, if you forget to use the await keyword then you will print out a Promise – which is a very easy bug to see and fix (don’t ask how I know this).
The above reasons are why async / await syntax has become the defacto standard for multi-threaded coding.
Summary
We first covered the history of CPUs all the way from single core, to multithread and multicore monsters. This development created a way to run parallel tasks in an application and gave rise to the asynchronous paradigm. This meant improved responsiveness and processing power in software.
However, the rise of asynchronous coding created several issues. How do you get a result and get notified when it’s ready? Callbacks were the first solution for this and work great, but chaining more than 2 requests creates ugly code and scoping issues.
The solution to callbacks was promises which was a syntax solution to these issues. However it still not adequately solve these issues.
Finally we looked at async await, which is just “syntactic sugar” over callbacks and promises but solve the problems defined above. Async & await prevents indentation issues and generally guides you to the right architecture by forcing you use the await keyword.
Ov real it reliably produces a fluid, main thread free user experience!
-
fs & Node: The Ultimate Async Guide (fs promises)
fs (file system) module is a much misunderstood part of node JS, especially the asynchronous versus the synchronous methods. This mega post will cover everything you need to know about fs and more! I include lot’s of architecture guides and potential gotchas (many of which have gotten me in the past).
fs stands for file system, so (almost) anything you can do to a file using your terminal or mouse can also be done with fs.
This article will start with basic file writes and move on to complex writes, file reads and file management. Please do read all the text between code examples as there are many many places you can be tripped up when using fs.
What can fs do?
Because fs is part of node JS on the server it has elevated privileges that allow it to access the file system. That said, if you find that certain file operations fail then please check the linux privileges of your node JS process / server app folder.
The fs module can do many things including:
- Open files
- Read files
- Create and write to files
- Update files
- Delete files
- Rename files
fs Callbacks, Async and General Notes
In this mammoth article we will cover the basic methods needed to read, write and manipulate files. Bear in mind that there are 2 variations of most file manipulation commands in fs, synchronous and asynchronous. Or async and sync for shorthand.
Important Developer PSA: You should always aim to use the asynchronous file manipulation methods. This is because node JS runs on a single thread, is non blocking and event based. Ie, node expects your code to not block the main thread unnecessarily, which is very important for the responsiveness of your server.
You will very rarely, if ever, need to use synchronous methods in fs so this guide focuses exclusively on the async methods.
Asynchronous methods are further sub divided into 3 versions – callback, promise or async based. These are all essentially the same thing, just different ways of writing code. If you’re not yet familiar with synchronous vs asynchronous programming then please click this to see my most excellent guide on it.
Personally, I always default to async await code. It’s easier to read, flows better and helps you avoid nasty problems like race conditions or cross scope variable assignment, bugs from which are very hard to diagnose.
In the first section (writing basic files) I will also show you the callback version of the sample code but future sections will only use the promise / await syntax. Just know that you can always revert to the callback versions by implementing the relevant structure (but why would you??!?!)
Basic File Writes with fs
Writing Basic Files – writeFile Function
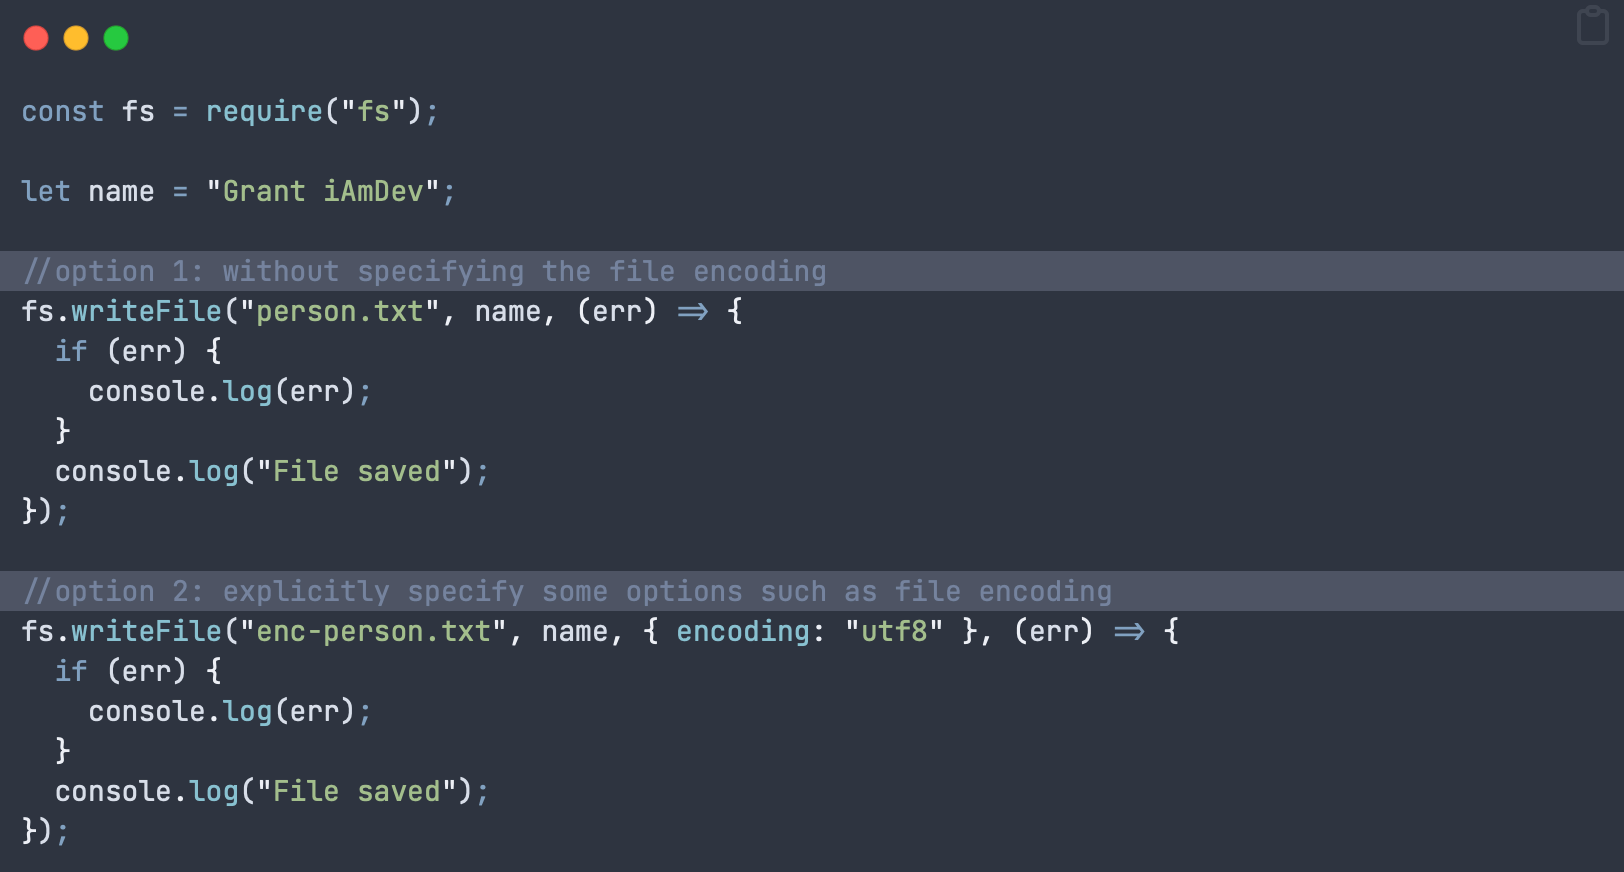
In order to write a basic file in fs we use the writeFile method, which takes 4 parameters:
writeFile (filePath, text to write, encoding (optional, defaults to utf8), return function)
NOTE: This callback version is for reference only, I strongly advise you to use the promises / await styles in the next section!
The callback below is implemented by passing in a function as the last argument of the writeFile method. That function is executed when the tasks completes:
const fs = require("fs");

let name = "Grant iAmDev";

//option 1: without specifying the file encoding
fs.writeFile("person.txt", name, (err) => {
  if (err) {
    console.log(err);
  }
  console.log("File saved");
});

//option 2: explicitly specify some options such as file encoding
fs.writeFile("enc-person.txt", name, { encoding: "utf8" }, (err) => {
  if (err) {
    console.log(err);
  }
  console.log("File saved");
});
Gotcha 1: writeFile will replace the file if it already exists! There will be no warnings and no thrown errors to let you know!
Gotcha 2: Do not run this method on a file whilst it is being written to by another writeFile call. You should have a flag to lock the file, preventing simultaneous writes!
Developer note: If you’re storing high frequency incoming data, or large data chunks then you should not use this method. Instead opt to use the createWriteStream method described later on.
writeFile – Promise Await Version (Avoid Callbacks)
If you prefer to avoid callback hell you can instead use the promises module included in fs. Note that the import statement changes to “fs/promises”. Quite often I’ve been caught out when visual studio auto imports just “fs” and I’m left scratching my head as to why the await statement doesn’t work!
Obviously, the promise version takes one less parameter as you don’t need to specify a callback function. Also note that we always enclose the writeFile call in a try-catch statement. This is necessary as access to a file is never guaranteed so could be a significant source of app crashes. If you have server logs ensure that a crash like this always gets recorded in there.
import fs from 'fs/promises'

async function writeData(name) {
  try {
    return await fs.writeFile("person.txt", name, "utf8") //options can use the shorthand version here, just a string automatically assigns file encoding
  } catch (err) {
    console.error('Error occurred while writing file:', err)
  }
}
In order to call the above “writeData” function you would use the following line:
await writeData("Grant @ iAmDev")This call will run asynchronously, without tying up your main thread, but will pause execution of your code until a result is received. This function call will not block code in other functions from running, and keeps your app / server responsive.
If there is no error thrown then you can assume that the operation was successful. HOWEVER, I find this code a bit problematic as I usually need to know explicitly if an operation failed or succeeded. The simplest version of this is to return a boolean indicating success or failure. This is the most basic version of this code and there are other things I may do, but those are beyond scope of this article:
async function writeBasicFilePromise() { //always return a boolean so you know if something failed or not
  try {
    await fsp.writeFile("person-promise.txt", textToWrite, "utf8")
    return true
  } catch (err) {
    console.error('Error occurred while writing file:', err)
    return false
  }
}

//call above function and look at returned "success" to determine code flow
const success = await writeBasicFilePromise()
console.log("File write successful? : " + success)
If you’re super fussy you may want to also assert that the file now exists and its content matches what you expect but I hardly ever find this to be necessary.
writeFile in fs – Complete List of Flags & Details
The options object passed in to writeFile allows you to specify filesystem flags that change the default behaviour when opening a file. Here’s a simple example:
await fsp.writeFile("person-promise.txt", textToWrite,
  {
    flag: "ax" //causes a thrown error if the file already exists!
  }
)
The following flags are available for you to use – be careful to choose the right one!
'a': Open file for writing (adding to the end of existing content) + the file is created if it does not exist (default)'ax': Like'a'but fails if the file path already exists'a+': Open file for reading and writing. The file is created if it does not exist.'ax+': Like'a+'but fails if the file path exists.'as': Open file for writing in synchronous mode (be careful not to tie up your main thread). File is created if it does not exist.'as+': Open file for reading and writing in synchronous mode. The file is created if it does not exist.'r': Open file for reading. An exception is thrown if the file does not exist so you need to catch that exception.'rs': Open file for reading in synchronous mode. An error is thrown if the file does not exist.'r+': Open file for reading and writing. Exception is thrown if the file does not exist.'rs+': Open file for reading and writing in synchronous mode. Instructs the operating system to bypass the local file system cache. This is useful for opening files on NFS mounts as it allows skipping the potentially stale local cache. It has a big impact on I/O performance so using this flag is not recommended unless it is really, really needed.'w': Open file for writing. The file is created (if it does not exist) or truncated (if it exists).'wx': Like'w'but fails if the path exists.'w+': Open file for reading and writing. The file is created (if it does not exist) or truncated (if it exists).'wx+': Like'w+'but fails if the path exists.
Add Content to File with fs (Append)
Now that we’ve covered basic file writes let’s look at how we add content to the end of a file. This is only really convenient if you want to add to the end of a file. Adding to the middle of a file is notoriously difficult and something you’d need to manage yourself.
Side note: If you ever find you need to write a line in the middle of a file then you should really revise your architecture / storage choices. Usually a structured database, of any kind, would be a much better choice.
We can add content to a file with the appendFile method:
const fs = require('node:fs/promises');

async function appendTextToFile() {
  try {
    const content = 'Extra content at end of file';
    await fs.appendFile('/Users/iamdev/data.txt', content);
  } catch (err) {
    console.log(err);
  }
}

appendTextToFile();
Note: You can also append to a file using the writeFile method and including the flag ‘a’.
Add Content to Start of a File with node fs (Prepend)
Unfortunately there is no simple way to add content to the start of a file using the standard fs module. However there are libraries that will do this for you such as prepend-file.
Another alternative is to read the content from your existing file into memory, insert your new data and write all that back to the same file. Watch out though, a large file will occupy a lot of memory and if you don’t garbage collect properly then you’ll have mega memory leaks!
Continuous File Writes in node fs
Many times your file writes will require insertion of multiple data blocks over a longer period of time. For this operation you will want to open up a stream that allows addition of data into a file over time, whilst avoiding the overhead of re-opening the same file.
This is achieved in fs with the createWriteStream asynchronous method.
createWriteStream async for Writing Large / Continuous Files in fs
This function is fairly complicated as you are moving into a level below high level writeFile. Therefore you have more control, but also more responsibility in terms of handling file closes, errors etc.
First let’s cover the basic createWriteStream method and all the arguments it can take (with explanations):
fs.createWriteStream (filePath, OPTIONS)

OPTIONS can include any of the following:
  options <Object>
    //Specify file encoding
    encoding <string> Default: 'utf8'

    //Should the file be autoclosed after write? If you set
    // to false then you must close the file yourself!
    autoClose <boolean> Default: true

    //An event telling our code if the file has been closed
    emitClose <boolean> Default: true

    //What location should this content be inserted to?
    // Takes an integer from 0-MAX_ALLOWED_INT
    start <integer>

    //highWaterMark is another way of saying buffer size before
    // actually writing to file
    highWaterMark <number> Default: 16384

    // File descriptor is flushed prior to closing. Defaults to false.
    flush <boolean>
Of particular note here is the highWaterMark option, aka: buffer size. This sets the amount of data to hold in memory until flushed to file. Note that you can get amazing memory leaks in the order of gigabytes if incorrectly specified for your use case. Whenever your server is running always use something like atop or htop to monitor resource usage!
Now let’s move onto a more substantial example. In the following we are trying to architect createWriteStream in an asynchronous manner. The code below shows you the logical steps you need to do this.
const fs = require('fs'); //the main fs lib

try { //always wrap in try catch as file writes can be error prone, especially on linux hosts...

  //create the writer object we can reuse
  let writer = await fs.createWriteStream('log-stream.txt', {
    encoding: 'utf8',
    highWaterMark: 16384,
    flags: 'a', //open and append (don't overwrite file)
  });

  //use the writer object
  await writer.write("Log 1: what happened in last 10s");
  await writer.write('\r'); //create a new line

  //sometime later
  await writer.write("Log 2: what happened in last 10s");

  //finally close the file to avoid memeroy leaks and file access issues!
  await writer.close()

} catch (err) {
  console.error('Error occurred while writing file:', err);
}
Important notes: The above function combines the creation of the write stream (createWriteStream), the write processes and the file close, to make it clear for you. In production you would put the file open, write and close in separate functions.
Then you can call each function as required by your application.
createWriteStream Events, Manual Close etc
As we’re operating at a lower level we can specify if we want file closes to be done automatically or if we should handle them. To do this we must handle these tasks to have a complete file writing system that we control all aspects of:
- Open the writer with createWriteStream
- Tell that writer we wish to handle file close ourselves, specifying the autoClose flag as “false”
- Register our own event listeners for open, ready and close
- Write content via that file writer (normally through a separately called function)
- Use listeners and callbacks to monitor state of our writes and file handling
- Close the writer on completion of a subset of writes / whenever is right for your application
- IMPORTANT: call removeAllListeners on completion to avoid memory leaks!
const fs = require('fs'); //the main fs lib

try {
  let writer = await fs.createWriteStream("log-stream.txt", {
    encoding: "utf8",
    highWaterMark: 16384,
    autoClose: false,
    emitClose: true,
    flags: "a"
  })

  //add a listener with options such as open, close, ready
  await writer.addListener("open", async () => {
    console.log("Log file OPEN!")
  })

  await writer.addListener("ready", async () => {
    console.log("Log file READY!")
  })

  await writer.addListener("close", (fd) => {
    console.log("Log file CLOSED")
  })

  writer.write("hello world \r\n", async () => {
    await closeWriter(writer)
  })
} catch (err) {
  console.error('Error occurred while writing file:', err)
}

async function closeWriter(writer) {
  await writer.close(async () => {
    await writer.removeAllListeners() // important to avoid memory leaks!
  })
}
The example code above does things in a stepwise, logical sequence to make it clear. Production code would never do it like this, instead separating it all into functions to be called when required by your app.
Reading files with fs
How to Use readFile in node fs
As with the writeFile function we looked at earlier the readFile function is much the same. Here’s some basic async await code:
const fs = require('node:fs/promises');


async function readAndPrintFile() {
  try {
    //print out the index.js file that contains your server code!
    const data = await fs.readFile('index.js', { encoding: 'utf8' });
    console.log(data);
  } catch (err) {
    console.log(err);
  }
}

await readAndPrintFile();
The above code will print out your index.js file, which should be your server entry point. CHange to any file in your directory as needed.
Note: This will read the whole file into memory. If you don’t have enough memory then your app will slow down at best, crash at worst! Obviously only use this for small files!
A better alternative is to use a stream to read files that are larger.
How to Use createReadStream Async to Read a File
A stream in Node creates a pipeline between content and your application. This avoids having to read a whole file into memory and you can instead listen out for chunks coming from your file:
async function streamTextFromFile() {
  //NOTE: This function combines createReadStream AND reads the file.
  // in reality you should separate these 2, only creating the stream once!
  try {
    let reader = await fs.createReadStream("index.js", 'utf8')
    reader.on('error', function (error) {
      console.log(`error: ${error.message}`);
    })

    reader.on('data', (chunk) => {
      //NOTE: this outputs RAW hex data if you DON'T set the encoding above!
      console.log(chunk);
    })

  } catch (err) {
    console.error('Error occurred while stream reading file:', err)
    return false
  }
}

await streamTextFromFile()
If you don’t specify file encoding then you will receive RAW file output (in hex).
Finally
If you enjoyed this but still need help with your application or server then feel free to contact me or find me working as a software developer in Gibraltar.
-
Definitive Guide to node-cron – Node JS Scheduling
Introduction
node-cronis a Node.js library that allows you to schedule periodic tasks using cron syntax. It allows you to define recurring schedules by specifying minute, hour, day of the month, month, and day of the week using cron-like strings.It’s very easy to use and you can schedule functions or tasks to execute at specific intervals, such as every minute, hourly, or on a custom schedule, including the ability to specify timezones.
Overall,
node-cronsimplifies the implementation of scheduled tasks in Node.js, making it a very good choice for automatic recurring processes.How to Install node-cron
Install node-cron using the following command in your project terminal:
npm install --save node-cronThere are no other dependencies or tasks to complete after this step.
Import / Require node-cron
node-cron supports both commonJS and ES Modules imports. By the way, if you’re struggling with a mixture of commonJS and ES modules then I can recommend bun js as a drop in replacement to nodejs. Bun lets you mix and match commonJS and ES modules.
Require node-cron (commonJS)
Use the following statement at the top of your file to import node via “require”.
var cron = require('node-cron');Import node-cron (ES Modules)
Use the following statement at the top of your file to import node-cron.
import cron from 'node-cron';Schedule a Basic Task in node-cron
In order to become fully proficient with node-corn you should first learn the cron syntax for time periods. Wikipedia will tell you all you need to know or have a look at the image below.
Cron Syntax
The following image is a basic run down of the cron syntax that node-cron relies on.
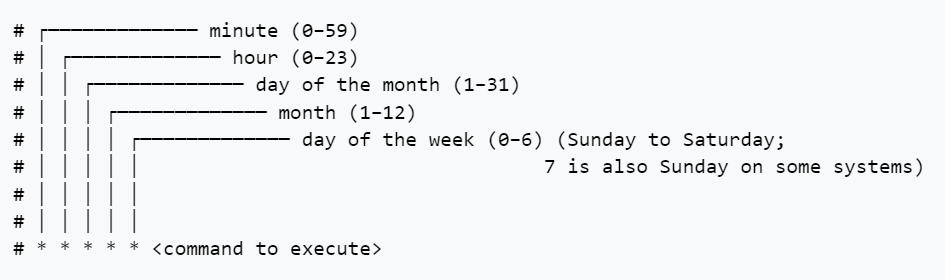
Image courtesy Wikipedia For example a command of * * * * * <code to execute> would execute your code every single minute. The asterisk (*) character denotes “every” so in this case “every minute of every hour of every day etc”.
A command of 1 * * * * <code> executes on the 1st minute of every hour, every day, every week etc.
Schedule a Task
To setup a task in node-cron simply use the imported object:
cron.schedule('* * * * *', () => {
  console.log('running a task every single minute for eternity...');
});
Configure node-cron Properties
The second argument when running the schedule method allows you set certain properties on the scheduled code. For example, below you can set the task to be registered but not actually scheduled to begin:
const task = cron.schedule('* * * * *', () =>  {
  console.log('this will not run until "task" is called with the start() method');
}, {
  scheduled: false
});
Full List of node-cron Configuration Properties
Scheduled
scheduled: true / falseBy default this is true and will register your job to start immediately.
Name your Task
name: 'any-name-you-like'The name is printed in logs which helps you identify where that particular entry came from.
Set a Timezone
You can setup your job to run at the schedule for a timezone. Uses the IANA standard timezone database for valid values.
timezone: Asia/ShanghaiRecover Missed Executions
node-cron can be setup to try and recover missed executions (eg, if your server restarts). I would advise caution with setting this to true. Otherwise, the default value is false.
recoverMissedExecutions: trueSchedule Multiple cron Times
node-cron allows you to chain multiple schedules to run the same job. Simply separate your cron values with a comma as below.
import cron from 'node-cron';

cron.schedule('0,15,30,45 * * * *', () => {
  console.log('running every 15 minutes');
});
Note that the comma separation (without spaces) applies to that particular entry in the cron specification.
Node-cron Specify a Range
To specify a range when you’d like your code to run then use the dash character:
import cron from 'node-cron';

cron.schedule('30-45 * * * *', () => {
  console.log('running every minute to the 30th minute to the 45th');
});
Node-cron Step Values (eg Every 2 minutes)
With the forward slash you can “divide” the range by a number. So in order to schedule something every 2 minutes at the start of the hour you could write:
import cron from 'node-cron';

cron.schedule('30-45/2 * * * *', () => {
  console.log('Run a task every two minutes from the 30th minute');
});
Node-cron Using Names for Months & Days
You can use month and day names instead of numbers if you prefer. Both full names and abbreviations work:
import cron from 'node-cron';

cron.schedule('* * * February,July Monday,Sunday', () => {
  console.log('running on all Mondays and Sundays of February & July');
});

//OR

cron.schedule('* * * Feb,Jul Mon,Sun', () => {
  console.log('running on all Mondays and Sundays of February & July');
});
Controlling node-cron, Methods
There are several handy methods that allow you to control the task you’ve setup.
Node-cron Schedule Method
We’ve covered this already. Simply sets up a task and schedules it.
cron.schedule('* * * * *', () => {
  console.log('running every minute');
});
Node-cron Start Method
If your task is setup and you choose the “scheduled: false” option then you’ll need to call start on the task to start the timer:
import cron from 'node-cron';

const task = cron.schedule('* * * * *', () =>  {
  console.log('task wont run');
}, {
  scheduled: false
});

task.start();
Stop Method
Any task can be stopped at any time. HOWEVER – exercise caution when using this programmatically. You may prematurely end a running task if you call stop. Best to thoroughly test this out and, of course, apply ACID principles so that you fail safe.
import cron from 'node-cron';

const task = cron.schedule('* * * * *', () =>  {
  console.log('will execute every minute, forever');
});

task.stop();
Validate Method
If you’d like to test the cron string before running it you can use the validate method:
import cron from 'node-cron';

const valid = cron.validate('45 * * * *');
const invalid = cron.validate('120 * * * *');
List all Tasks Method
You can list all tasks in the scheduler by using:
import cron from 'node-cron';

const tasks = cron.getTasks();

for (let [key, value] of tasks.entries()) {
  console.log("key: ", key)
  console.log("value: ", value)
}
Iterating the list will return all the objects with associated metadata, including execution data:
- _events
- _eventsCount
- _maxListeners
- options
- _task
- ….and more….
-
Bun Hot Reload Not Working – 3 Fixes
Is hot reloading not working in your bun.js project? This article gives you 3 potential fixes (from a real developer).
First of all there are 2 ways you can hot reload code in your project:
- bun –hot index.ts
- bun –watch index.ts
The first one, –hot, watches your files for changes and only reloads the content. It DOES NOT restart the bun process. Therefore if your new code has some dependancy on the process restarting then it (probably) won’t be picked up. This bug may appear if you’re trying to read bun env files through a hot reload!
–hot reloading is great if you’re only working on content and want to keep state in your server across reloads. If you don’t need that then it’s much better to do a cold reload as below:
Fix 1: Use the –watch command instead of –hot
You’re much better off using the –watch command to “hot” reload the app on changes. This behaves more more like the traditional way of hot reloading in node.js, for example when using pm2, nodemon or similar process managers.
Note that each detected change causes the bun process to restart and server state will be lost.
Fix 2: WSL (Linux on Windows) doesn’t hot reload
This is a know bug when using bun.js on Windows Subsystem for Linux. The process somehow doesn’t pick up the changes in files on the Windows file system. See this issue on github: https://github.com/oven-sh/bun/issues/5155
Fix a) The best option is to run bun on native Linux or Mac of course but for some devs that’s not an option due to work place restrictions.
Fix b) Personally I use a Virtual Machine in Virtualbox or VMware and bun runs as expected. Again this may not be an option due to IT restrictions.
Also note: bun is not ready for prime time on Windows just yet (start of 2024) so you may run into other issues that aren’t yet documented.
Fix 3: Use a traditional code watcher
You don’t have to use the bun.js watcher tools. Traditional code watchers and reloaders work well too. In fact, if you’re migrating from node then you probably already have these services setup and don’t particularly want to change them out for the bun alternative.
a) You can use pm2 (my go to) to reload your project: https://www.npmjs.com/package/pm2
b) You can also use nodemon to do the same: https://www.npmjs.com/package/nodemon
Have you had any other issues with bun.js? If so then please leave them in the comments below!
Finally
If you want the easy route to bun mastery then check out my course on bun and Elysia Framework. It has everything you need to get you started.
-
How to Use Files in Bun JS
Bun comes with its own modules for handling file read and writes. Let’s whip up a simple server that allows us to see this in action.
Read a File with Bun
Initialise a new server and paste in the following code to your index.ts file:
const server = Bun.serve({
  port: 3000,
  async fetch(req) {
    const url = new URL(req.url);

    if (url.pathname === "/")
      return new Response(Bun.file("index.html"), {
        headers: {
          "Content-Type": "text/html",
        },
      });

    return new Response("404 Not Found", { status: 404 });
  },
});

console.log(`Server running at http://localhost:${server.port}`);
This will read an index.html file off disk and return a bun response to the caller. Let’s create a simple html file in the project root:
<!DOCTYPE <em>html</em>>
<html>
  <head>
    <meta <em>charset</em>="utf-8" />
    <title>Hello World of bun</title>
  </head>
  <body>
    Bun is sooper fast!
  </body>
</html>
Go ahead and run your server with
bun index.tsIf you navigate to localhost:3000 you should see the index.html response returned and rendered.
Bun JS and Json Files
Bun includes support for reading JSON files natively. Create a server.json file in your project root folder and paste in some JSON:
{
  "production": false,
  "version": "0.1alpha"
}
Now in your index.ts file you can log that file anywhere you please:
const serverDeets = Bun.file("server.json")
console.log(await serverDeets.json())
Note that the file API is asynchronous and that you need to call the file type as a function, in this case .json(). From there you can select properties from the file in the usual manner, eg:
console.log((await serverDeets.json()).version)Be aware that if your file doesn’t exist you will get an error that stops your server. It also outputs that error to the endpoint being requested (including the code surrounding it!).
I’m not sure if that only happens in the development phase but I sure hope it doesn’t happen in production – otherwise that’s a security hole! Imagine if a private key is stored in code and gets output in that error log! (Don’t judge me, we all do it from time to time thinking we can ‘refactor’ later… 😉